Wednesday, June 27, 2012

Eldeberries in Full Bloom

DSC_0121
We have two enormous elderberry bushes next to our unit and they are in full bloom at the moment.  The tiny flowers smell amazing.

DSC_0126
And they're very interesting up close.  I've never tasted an elderberry before.  I wonder if they would make for a good wine.

Home Winemaking - Juneberry (Saskatoon, Serviceberry) Wine

DSC_0166
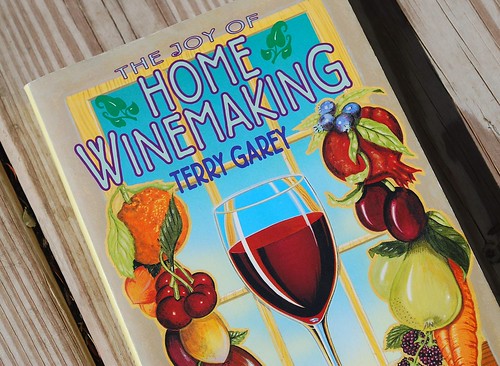
When Borders bookstore went out of business last year, I made several trips during the last few weeks of its life to raid the gardening and cooking sections. When all was said and done, I ended up with a large stack of books, and Terry Garey's "The Joy of Home Winemaking" was one of them.

I've been wanting to learn the craft of home winemaking for a while now. I think it all started when I watched the movie Anne of Green Gables on PBS (I think I was about 10 years old at the time) and was intrigued when a young Diana Barry, with a little help from Anne, got drunk off of Miss. Cuthbert's homemade red currant wine.  Fast forward twenty years later, I bought my first bottle of red currant wine from a local farm while we were living in Massachusetts, and well... let's just say I wasn't exactly smitten with the stuff.  The flavor of the wine was fine enough, but it was awfully sweet.  I began to think that most commercial fruit wines were produced this way and unfortunately for me, I prefer my wines on the drier end of the spectrum. 

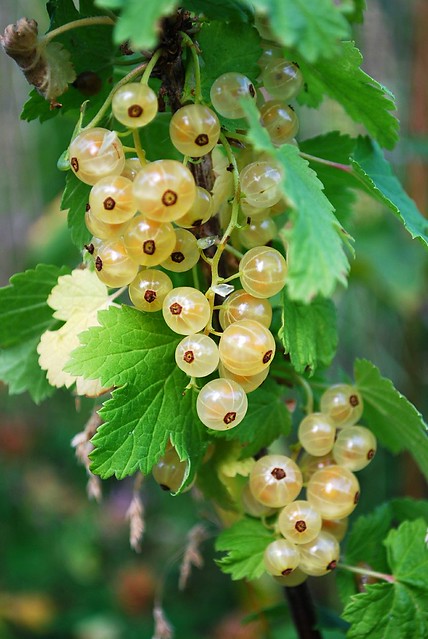
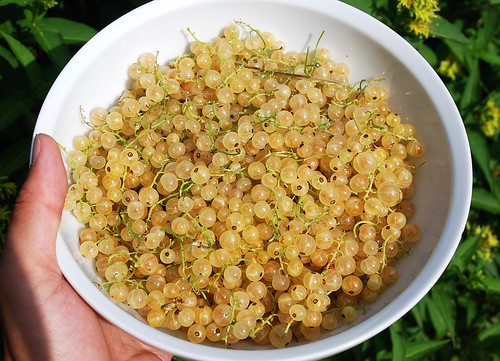
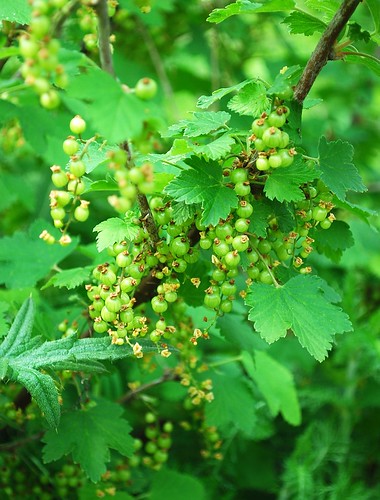
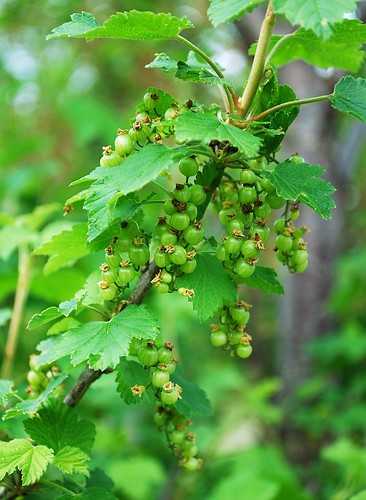
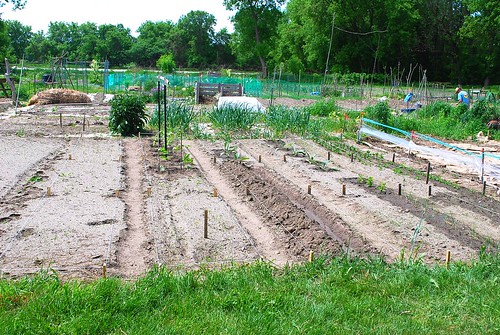
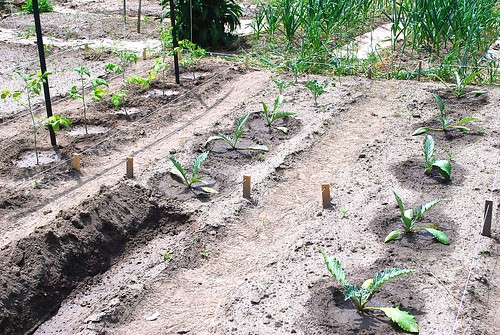
Anyway, not too long ago, it dawned on me that all of our currant shrubs (courtesy of our landlord) might produce enough fruit this year to kick start this new endeavor of mine.  If the birds stay away, I think we'll have enough red, white and black currants to make several gallons of wine.  Like most hobbies (gardening being one of them), I'm expecting a steep learning curve in the beginning and lots of terrible wine along the way.  But I've always believed that it's partly the mistakes that make learning a new craft all the more interesting and exciting.

DSC_0146
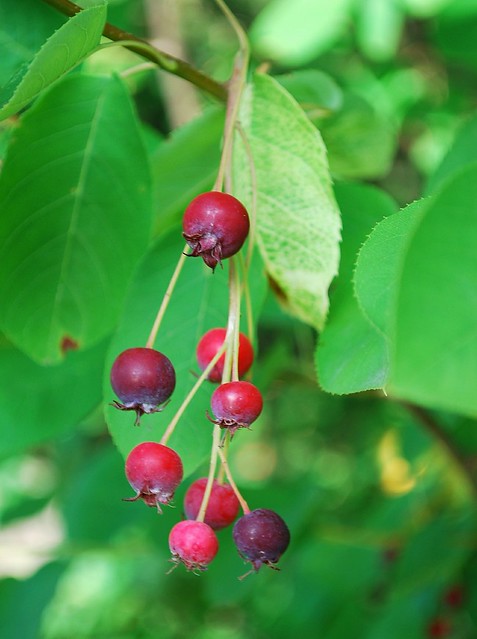
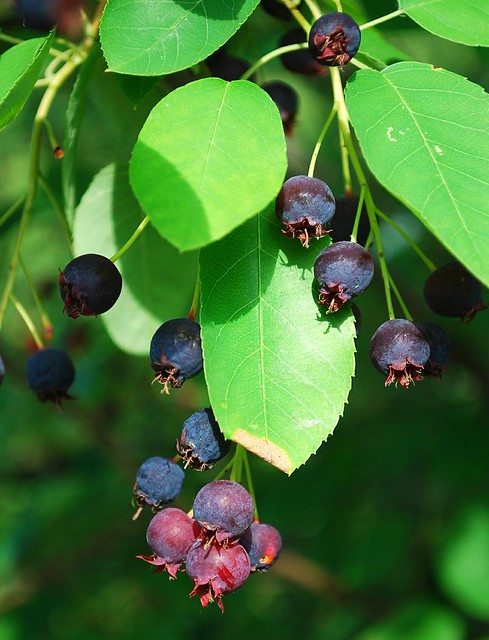
I was expecting that my first wine would be made from currants, but thanks to our kind neighbor who introduced me to them, it will be made from most of the juneberries I picked this past weekend.  It seems somehow more fitting that my first attempt at making wine would involve a wild edible fruit.  I'm sure this was how it was done centuries ago before the first European wine grapes were ever cultivated.  And it just so happens that I found a recipe (or should I say 'guide') for making juneberry wine online.  (Jack Keller maintains a rather impressive site containing tons of recipes and advice for winemaking novices.)

DSC_0153
Last Saturday, we made a trip to the 
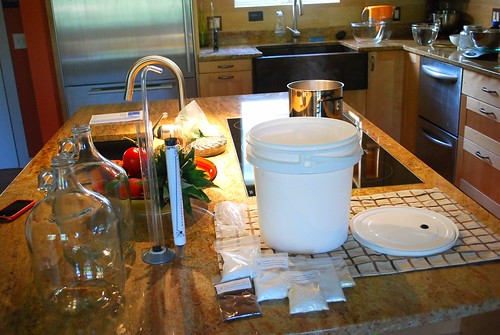
Vermont Homebrew Store to set some supplies (a convenient 5 minute drive from our place).  I spent about $75 but I'm sure you could get started on much less depending on what you already have lying around the house. (Jack Keller has a great list of basic supplies you would need in order to get started.) In fact, one of our neighbors kindly gave me a one gallon glass apple juice jug to use during the secondary fermentation stage of this project.  (I don't think I'll make any batches larger than a gallon until I get the hang of this as one gallon of awful wine down the drain is not as heartbreaking as say three or five.)  I've also sent word to a few of our friends to save their empty wine bottles.

I won't go into detail about what I've learned so far about the basics of home winemaking as I am in no position to be giving any sort advise on this subject at this point of the game, but I thought I'd at least describe what I did, along with my observations, here more for my own sake than anything else (in the event this wine actually turns out well).  In any case, I woke up early on Sunday to get things started.  I ended up using the ingredients listed in Jack Keller's third recipe but referred to some of the advice given in Terry Garey's book when putting it together.

DSC_0155
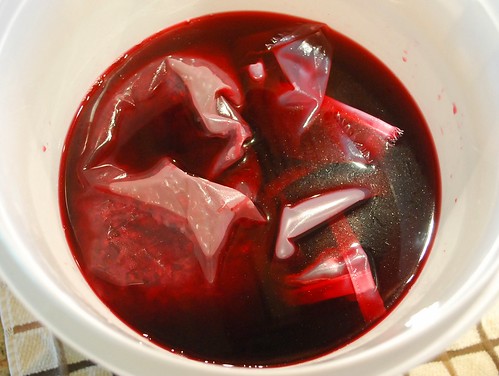
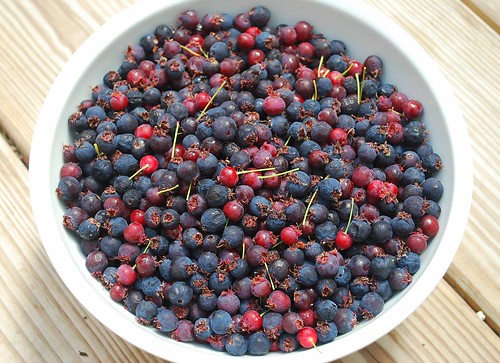
I started out by mashing 3 lbs of juneberries in a large pot and brought it to a boil along with 6 cups of water and the juice of 2 lemons.  After it simmered for about 10 minutes, I poured it into a  nylon jelly bag that I'd placed inside my primary fermenter.  Then I brought another 8 cups of water to a boil, into which I dissolved 2 1/2 lbs of sugar, and poured this into my primary as well.  Into this mix I added 1 lb of minced raisins in a second jelly bag.  I then covered the bucket and allowed it to cool down for a couple of hours.  When the mixture (or 'must') was lukewarm, I stirred in 1 teaspoon of yeast nutrient and 1 crushed Campden tablet, which I'd dissolved in a small amount of the must first. (I did notice that the color of the must lightened a bit when I added the tablet, but it still retained much of its ruby red color.)  Then the top went back on but this time fitted with an airlock. 

At this point, there was a strong yet lovely scent of almonds or amaretto to the must, which I'm sure was imparted by the seeds.  The smell subsided after it sat for a while and I was afraid that the addition of the raisins would overpower the flavor of the juneberries.  I guess I'll find out eventually.

DSC_0163
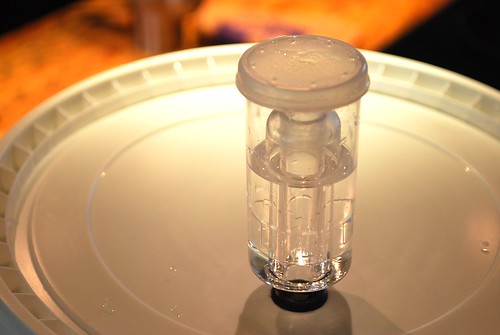
Twelve hours after I added the Campden tablet, I stirred in 1 teaspoon of pectic enzyme and recovered (late Sunday night). Twelve hours later, I sprinkled a packet of Champagne yeast over the surface of the must and recovered again.  Within a few hours, I could tell that fermentation was starting as the airlock started to release gas.

Marc has been given the task of giving the must a gentle stir once a day while I'm away.  After 5 days, the nylon bag containing the juneberries will be removed and the must will be allowed to ferment for another 5 days before the raisins are removed and the must is siphoned to the secondary fermentation vessel if all goes well.  I'll be sure to provide updates as we go along. 

(In case you're interested, here is a glossary of basic winemaking terms.)

Tuesday, June 26, 2012

Blackberry Flowers

DSC_0138
We have some blackberry canes that flowers not too long ago.  Unlike the ones we had at our old house and the wild ones that grow along the woods surrounding our development, these canes produce some stunning pink flowers.  I can't wait to find out what this particular variety tastes like.

Wild Edibles - Juneberries! (Saskatoons, Serviceberries)

DSC_0118
The other morning, I ran into a neighbor of ours holding a pot of purplish blue berries she'd just picked from several tall bushes planted throughout our development.  At that moment, I was introduced to the world of juneberries, also known as saskatoons and serviceberries. I'd read about them before but never knew enough to recognize them in the world.  When she had me try one, I was really surprised by how very sweet and tasty they were.  The flower ends are a bit though and the seeds are more pronounced than say blueberry seeds, but I can imagine they would make a wonderful jam if strained and with a bit of acid added into the mix.  Interesting thing about the seeds - if you bite into them, you get this little burst of almond flavor. 

DSC_0120
Juneberries start out red but ripen into a purplish blue.  I was surprised to find that most of the bushes had been left unpicked and that many of the berries had shriveled up under the recent heatwave.  Despite this, Jonathan and I (well, mostly me) picked about 4 lbs of decent-looking berries, some of which I'll turn into a dessert for one of our community dinners and the rest...well you'll find out tomorrow. 

DSC_0143
The interesting thing about wild edibles (by this, I mean plants you normally wouldn't find in the supermarket or even at the farmers markets) is that once you are formally introduced to them and experience their goodness, they usually stay with your for the rest of your life.  This time next year, I can imagine Jonathan recognizing juneberries whenever and wherever they appear during our outings. 

Monday, June 25, 2012

Rugosa Rose

DSC_0131
We have two beautiful and very fragrant white rugosa rose bushes outside of our townhouse.  There are a few nice pink ones around the development as well.  Once the flowers have faded, I think I'll try taking some green wood cuttings.  I might be mistaken but I think they root pretty readily.  The difficult thing will be handling the stems, which are absolutely covered with pin like thorns.  Tongs will surely come in handy.

I'm also looking forward to harvesting some rose hips this fall.  Rugosa roses (a member of the apple family) produce large edible hips.  Last year my former next door neighbor brought back from Poland some tasty cookies filled with rose hip jam.  I'm looking forward to making some of my own this year.

Sunday, June 24, 2012

What's in Season - End of Spring Harvest

DSC_0121
It still amazes my that these small rather plain looking flowers become...

DSC_0128
...THIS!  I really look forward to picking (and eating) fava beans each year.  They are probably up there with tomatoes on my list of most desired homegrown veggies.  My favas germinated incredibly well this year and have produced a good amount of beans. 

DSC_0123
This past weekend, I walked by my shell peas noticed they needed to be picked as well.

DSC_0125
My shell peas on the other hand did not germinate well for me.  But what did make it went on to produce a respectable number of pods.

DSC_0137
I might be in the minority here but I like to pick my peas when they look like they are on the verge of bursting from their pods.  At this stage, they are starchier but I like them this way because they remind of the peas from my childhood...only they don't taste like a tin can.

DSC_0123
The pickling cucumbers are rolling in as well.  I have a large bag of them in the fridge, which I need to turn asap into fresh dill pickles.

DSC_0135
Ahhh, and yes, the first zucchini of the summer reared it head a few days ago.  I've cut down to two plants this year...more than enough for a family of three in my opinion.

DSC_0116
Finally, a while back I did end up picking some sour cherries.  They were quite good on their own but some did make it onto an apple tart I made.

Saturday, June 23, 2012

What's In Season - White Currants

DSC_0125
I was excited to find yesterday that the white currants were ready to be picked.  The reds still need another week or so and the black currants are ripening a few at a time.  

DSC_0134
We have one small white currant bush, which was covered underneath a thick canopy of tall weeds.  I was surprised that we able to get exactly a pound of fruit.  I have BIG plans for these!

Strangely, this year I'm more excited about all of the fruit shrubs we have growing around our unit than I am about my vegetable garden.  It's nice to have such a big reward from so little effort!

Friday, June 15, 2012

North Star Sour Cherries

DSC_0136
A week ago, the cherries on the dwarf 'North Star' sour cherry tree next to our condo looked yellow.  This morning, I went out and they looked like this:

DSC_0117
So now my question is - how do you know when then sour cherries are ripe?  They feel moderately soft to the touch and the one I tasted was juicy and sour enough.  Is that good enough?

Wednesday, June 13, 2012

Fruit Propagation Update

DSC_0125
The cranberry plants I divided earlier this year are putting on lots of new growth.  I have about a dozen potted plants now from the two that I purchased three years ago.  Strangely, they haven't produced many flowers (and hence, fruit) during this time. I wonder if there is something I should be doing that I'm not.

DSC_0119
I also have seven raspberry plants that I grew from suckers taken from our old garden.  After I potted them up, I placed them inside a sealed plastic bag for about a month until sufficient roots formed to support the foliage.  I love this everbearing variety and was glad that they survived.  They've since been moved to my community garden plot.

On the left-hand side are black and red currant hard wood cuttings that I took in early spring.  I removed about half of the buds and applied some rooting hormone to the cut ends before potting them up and placing them into a sealed plastic bag for about 6 weeks.   From the 6 cuttings that I took, 4 went on to root successfully.  I imagine they all would have survived if I'd noticed that they'd become infested with whiteflies and tiny leaf-eating caterpillars while they were covered in plastic.

Soon, I plan on taking even more cuttings from from all of the fruit shrubs around our townhouse.  It'll be a few years before we settle into a more permanent home. By then, I hope to have a ton of potted fruit shrubs ready to be transplanted. 

Tuesday, June 12, 2012

What's In Season

DSC_0126
I thought I'd do a quick rundown of what we're eating right now.  Last weekend, Jonathan and I went out and picked some snow peas.  He ended up eating two-thirds of the bowl. 

DSC_0124
I've grown 'snowbird' for the past three years and it always seems to produce a ton of pods each spring.

DSC_0147
The broccoli is about ready as well.

DSC_0139
I tend to get smaller crowns in the spring.  The fall ones are usually twice this size.  I've grown 'Bonanza' for the past couple of years and it has proven to be very reliable from germination to harvest.  Unfortunately, I haven't seen this variety for sale lately and my seed stash is running low so this might be the last year I'll be growing it.

DSC_0150
My 'Winter Density' lettuce was on the verge of bolting so I picked it.  It has a slight bitter edge now but not too bad.

DSC_0152
Finally, 'Hakurei' are my favorite turnips to eat.  They are very mild, sweet and perfect simple steamed with a bit of butter or sauteed.


Monday, June 11, 2012

Our Raised Beds

DSC_0126
These pictures are outdated at this point but here's an idea of what we have planted in the raised beds behind our unit.  The largest one closest to the house contains most of my tomatoes, all of my peppers, some cucumbers and bush beans.  I'm not growing nearly as many tomatoes as I used to but I still think that we'll have enough to suit our needs.

I was hoping that, like the slugs, the cucumber beetles here would not be as bad as they were at the old garden.  Unfortunately, they are even WORSE and it'll be interesting to see whether I'll be able to get a decent cucumber harvest this year.

DSC_0117
I also have some container tomatoes this years.  Orange Blossom is the lone early determinate tomato I'm growing this year.  I figured it would be best suited for container growing.

In addition to these, we have melons and zucchini planted behind our house.  And as the spring greens and veggies clear out, I'll plant our falls veggies starting in late July.

DSC_0128
I still find it fascinating to think that these little flowers result in something as amazingly delicious as an heirloom tomato.

Thursday, June 7, 2012

Cooking up the Harvest - Crab Cakes and Sauteed Spicy Asparagus

DSC_0146
I made this a while ago but never had a chance to blog about it.  One of my favorite things in the world is homemade lump crab cakes.  I've been making this recipe from Cooking Light magazine for years now and it's still one of my favorites - simple and delicious.  To get the biggest lumps of crab for this recipe, I usually buy whole dungeness crabs from the market and shell them myself.

On this particular occasion, I made a simple salad with some homegrown mizuna and some spicy sauteed asparagus (also homegrown).  To make the asparagus, brown a couple tablespoons of butter in a shallow pan on high heat.  Add the asparagus and toss.  Add some soy sauce and continue to saute for a couple of minutes or until most of the liquid has evaporated and the soy sauce appears somewhat caramelized.  At the very end, add a fair amount a fine chili paste and cook for a few more seconds.  This is my favorite way to prepare Asparagus and green beans (especially when I'm feeling lazy).

Wednesday, June 6, 2012

Chrysanthemum Tea Plants - Update

DSC_0140
A while back, I dug up two of my four Chrysanthemum tea plants from the old garden and brought them up to Vermont.  Since then, they've fared pretty well as potted specimens.  In prior years, I've left them to grow unattended without much care on my part, which probably explains why they ended up looking leggy and not very well formed by summer's end.  This year, I've decided to prune them vigorously in order to get a bushier looking plant and also to get more flowers (hopefully).  This is a photo I took a couple weeks ago, and since then, they grown much larger. I've already pruned them a second time. 

Growing my chrysanthemum tea plants in pots is probably the only away I'll be able to get any flowers to dry into tea in Zone 5 Vermont as the plants tend to bloom in November - well after our usual fall frost date.  Although the flowers themselves are pretty frost tolerant, even in Zone 6 Massachusetts, the window to harvest them was extremely short and never guaranteed before a serious hard frost would wipe them all out.  This fall I will probably bring them indoors in September, pick the flowers in November, and then let them overwinter in a semi-protected sheltered place like our enclosed porch. 

Berry Update

DSC_0130
We have four pathetic looking blueberry bushes in the back of the house but surprisingly, they all have a fair amount of blueberries on them.  I'm keeping my fingers crossed that we might actually be able to pick a few this year...that is if the birds stay away.  I'm also going to try rooting some green stem cuttings later on this summer.

DSC_0153
The red and black currant bushes are loaded with fruit.  I'd like to dry the black ones and make red currant jelly if we get enough.

DSC_0159
Although I've never picked them before, currants seem rather tedious to harvest.  However, the little clusters of fruit sure do look inviting.  The leaves themselves also have a wonderfully pungent wine-y dark fruit scent to them. 

DSC_0166
The gooseberries are fattening up as well.  It's another soft fruit that I've grown to love.

In addition to these, our raspberries are growing like gangbusters and there are a ton of flowering blackberry canes growing wild all around the development.  I've been told that they are suspected to be a cultivated variety that was planted by someone before the land was developed here so I might dig up a few plants to take with us if ever we decide leave this wonderful home we're renting.  

Tuesday, June 5, 2012

The Season for Asian Greens

DSC_0123
Our fridge is well stocked with Asian greens at the moment although the season for them is quickly coming to an end as the weather heats up.

DSC_0161
I've grown bok choy now for that past three years and this is my best crop yet.  Unlike our old garden, slugs don't seem to be much of a problem here, although I have spotted a few. In prior years, I would lose about 30 to 40 percent of my crop from slug damage alone but this year, every single one was made it to harvest unscathed.

DSC_0159
This is my first time growing this larger white stem variety (Win-Win Choi).  It's much milder than the green stem varieties and contains a lot more water but strays very crisp when sauteed.  I highly recommend it.

DSC_0119
Of course I'm also growing my usual tatsoi and Shanghai bok choy. I've probably mentioned this before but my favorite way to prepare bok choy is so saute them in some butter on high heat.  I add season with soy sauce, a couple pinches of sugar and some chile paste. Delicious!

Friday, June 1, 2012

The Intervale - My Community Garden Plot

DSC_0123
Wow... I can't believe I've neglected my blog for the past couple of weeks.  I really need to get my act together!  On a side note, this is my 600th post!  They sure really add up after a while. 

Anyway, I realize I hadn't posted any pictures of my community garden plot. (I wish I was British so I could refer to it as my "allotment," which in my opinion, has a nicer ring to it.)  I'm not entirely sure of the exact dimensions but it's a good size.  The soil is in excellent shape (a nice sandy loam), and was planted with winter rye this past fall and tilled earlier this spring.  There are two types of plots at the Intervale - till and no-till.  Gardeners who have till plots must have everything removed by mid-October and are assigned new freshly tilled plots each April.  Those who have no-till plots can stay year round, plant perennials and erect fences and other structures.  A few spaces opened up in the no-till section this year (I'm sure Hurricane Irene had something to do with it) so I jumped on one.  (Normally you have to garden here for at least a year here before you can apply for one.)  The thought of have a blank canvas to work with every year was tempting, but in the end, I opted for an extended growing season.

DSC_0146
I'm trying to keep things simple this year.  Only a few of the gardeners here have fences erected although I've been told that we have our fair share of garden pests (human and of the furrier sort).  I think I'll forgo the fence this year and take my chances (living dangerous, I know).  I have however lined my planting beds with string so I don't trample over everything.  Currently, I have shell peas, fava beans, onions, potatoes, celery, tomatoes (only five plants), peppers (only two) and artichokes planted here.  This weekend, I'll plant some corn, soybeans, beets and some perennials. 

DSC_0150
The artichokes are off to a good start despite the colder climate here so I'm hopeful that we'll get a few edible buds this year.

Lastly, expect a stream of posts during the next few days!