Wednesday, August 31, 2011

In the Kitchen - Naan Bread Recipe

DSC_0017
It's been while since I've posted a bread recipe. I love this one because you can start it at 9 am, let the dough rise for a couple of hours and have warm naan bread ready by lunchtime - perfect for a flat bread style sandwich or for dipping into a hot bowl of soup. You can also allow the dough to rest for a longer period if you aren't able to bake it straight away.

Naan Bread Recipe
3 cups bread flour
1 1/3 cups tepid water (80 - 90 degrees F)
1 teaspoon active dry yeast
1 1/2 teaspoons salt
2 tablespoons butter, melted
1 clove garlic, minced (optional)

Stand-mixer directions:
Pour the water into the bowl of an electric strand-mixer fitted with a dough hook and add the yeast. Stir with a wooden spoon to dissolve the yeast. Mix together the salt and flour in a medium bowl. Add the flour mixture to the water and begin mixing on low until the dough begins to gather around the dough hook. Turn up the speed to medium and continue kneading the dough for 5 minutes or until it is smooth and taut.

Hand-kneading directions:
Pour the water into a large bowl and add the yeast. Stir with a wooden spoon to dissolve the yeast. Mix together the salt and flour in a medium bowl. Begin by adding 1 1/2 cups of the flour mixture to the water. Stir this in the same direction for a couple of minutes to begin developing the gluten. Add the remaining flour 1/2 cup at a time, continuing to stir until the dough becomes too stiff to work with the spoon. Fold the dough a few times with your hand to incorporate the remaining flour. Turn the dough out onto a lightly floured surface and knead it vigorously for 10 minutes. Dust with more flour if necessary. At the end of the 10 minutes, the dough should be smooth and taut.

DSC_0032
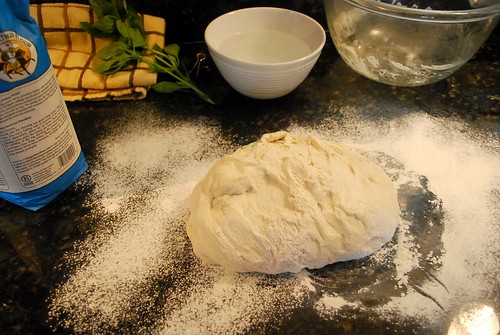
Transfer the dough to a lightly oiled bowl. Cover the bowl with plastic wrap and allow the dough to rise at room temperature for at least 2 hours. It should double in volume by the end of this period. (You can also allow the dough to rise slowly overnight in the refrigerator. Bring it to room temperature before moving forward.)

DSC_0005
Melt the butter in a small pan on medium-low heat. Add the garlic and swirl it around as it sizzles for about 20 - 30 seconds. Remove from heat and set aside. (I don't bother to clarify my melted butter but you can if you like.)

Gas stove top directions:
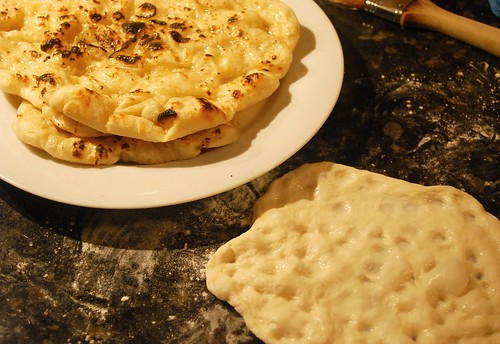
Unless you have a tandoor, I would recommend this method. What it lacks in "authenticity" it more than makes up for in convenience. Heat a covered cast iron pan on medium heat on top of your gas stove. Remove the dough from the bowl and place it onto your lightly floured work surface. Cut a 4 ounce piece of dough from the ball. Using your hands, pull and flatten it into a disk about 7 inches in diameter (like you would a pizza dough). Don't worry if the disk isn't perfectly round or uniform in thickness. These variables will give the finished bread its rustic look and contrasting textures. Dip your fingers into a bowl of cool water and press them into the dough, creating dimples throughout the surface of the disk. Don't worry about getting the top too wet. (In fact, you want it be fairly wet as this helps to give the finished bread it's classic chewy texture.) Cut another piece of dough from the ball and repeat this process.

DSC_0040
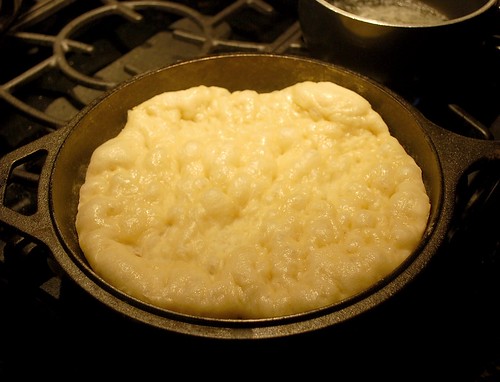
Once the first round has rested for a few minutes, remove the lid and gently place the dough into the heated pan dimple side up. Replace the lid and let the bread bake for about 4 minutes or until the top looks puffed and somewhat translucent. As the bread is baking, re-dust your work surface with flour and work on your third round of dough. When it is done, remove the bread with a pair of tongs and place the second round into the pan to bake. (If the bottom of the bread looks too brown or scorched, lower the heat a bit.)

DSC_0007
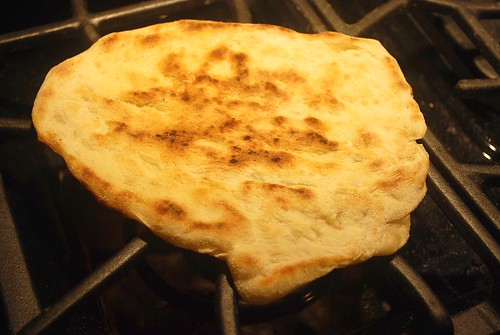
Light another burner to its medium setting and place the first round top-side down directly onto the burner. Using your tongs, move the bread around to evenly char the top. (This should only take a few seconds.) Place the finished bread onto a plate and lightly brush the top with some melted butter. Work on your next round of dough. Repeat this process for the remainder of the dough.

Oven Directions:
Position a baking stone onto the center of the oven and preheat it to 500 degrees F. Remove the dough from the bowl and place it on your lightly floured work surface. Cut it into 2 pieces. Pull and press the first piece into a rather large and thin (1/4 - 3/8 inch thickness) oblong shape. Again, don't worry if the thickness of the disk is not uniform or tears in some places. Dip your figures into a bowl of cool water and press them down into the surface of the dough, creating wet dimples throughout. Let the dough rest for a few minutes. Then carefully place the dough onto the baking stone and bake for 5 minutes or until the bread looks puffed and lightly browned on top. While the first loaf is baking, work on the second piece of dough. Brush the finished bread with melted butter.

DSC_0022
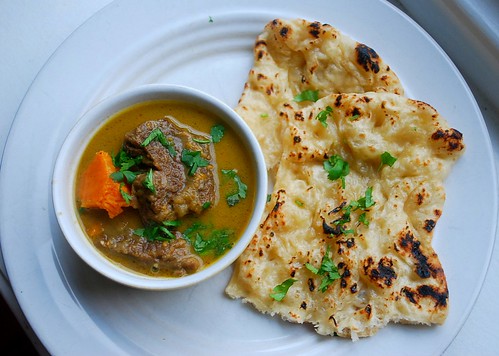
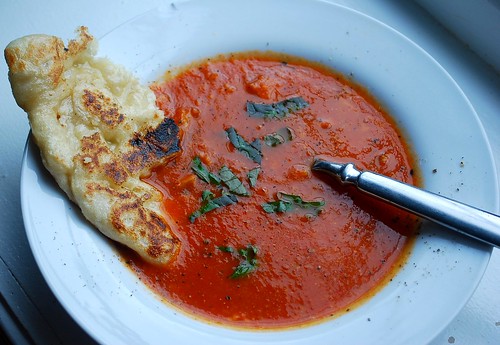
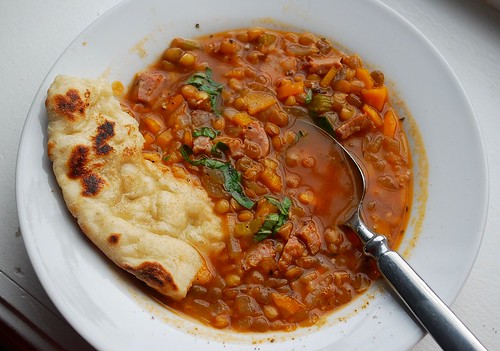
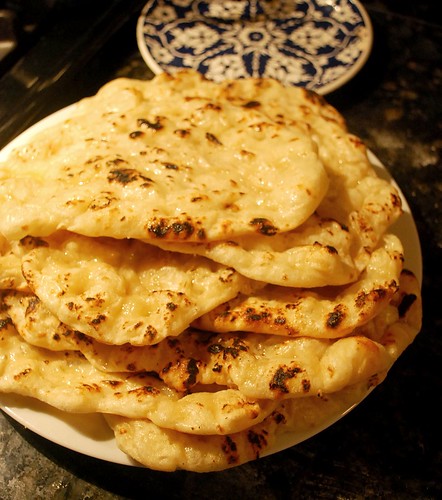
I generally use the stove top method when making this bread. Once you get into a rhythm, the steps become pretty straight forward. Recently I made a batch to accompany a beef and sweet potato curry. This is definitely one of my favorite breads to dip with. This bread is best when served immediately after baking. However, it is also great toasted the next day.

Please note: Some regions of the world make naan bread with milk and yoghurt, which I've read adds thickness and volume to the finished bread. Others do not. I might experiment with this recipe though and incorporate these ingredients for fun. It will be interesting to see how it affects the end result.

Tuesday, August 30, 2011

Urban Agriculture and Detroit

Watch the full episode. See more Need To Know.

Here is an interesting video produced by PBS regarding Detroit's developing agricultural scene. Can urban farming help to revitalize this once booming industrial city?

Monday, August 29, 2011

Late August Harvest

DSC_0019
A few weeks ago I was speculating that we might not have planted enough tomatoes this year. Well, let's just say that I'm not feeling that way now.

DSC_0071
I'm happy to say that we've now preserved enough tomato sauce, puree(for soup) and salsa to get us through the next 12 months. Sure we weren't able to give away as many tomatoes as I would have liked but 20 plants seem to be the magic number for us. More than that just creates more unnecessary work and would waste valuable growing space.

DSC_0070
Our peppers have done really well this year, particularly the Hungarian Wax. I've been roasting, peeling and freezing all of them. I have a lot of Jalapeno peppers that I think I'll let turn red and then make hot sauce.

DSC_0026
Before this weekend's storm arrived, I pulled the rest of my soy beans.

DSC_0060
We ended up with a good haul of pods, which has since been frozen. Edamame is a great snack for kids because the steamed beans are so fun to shell and eat.

DSC_0066
I also picked two of our Blacktail Mountain watermelons and acorn squash. The squash vine was practically dead from borers and powdering mildew.

DSC_0017
The first watermelon I picked was good.

DSC_0026
The second one I picked was GREAT!

Sunday, August 28, 2011

Tropical Storm Sunday

DSC_0095
It's been raining for most of the morning, but boy, the winds are really starting to pick up now. I don't remember the last time the Northeast was under the direct path of a hurricane or tropical storm. It will be interesting to see how the garden holds up. I have a feeling my giant purple sprouting broccoli will be horizontal by the end of today. We don't expect too much damage in our area but I'm hoping that we won't lose electricity.

DSC_0053
Whenever we're confronted with a major weather event, whether it be a winter blizzard or a summer thunderstorm, I always get the tremendous urge to make soup. This time around, I made two kinds - a tomato soup for Marc (using our homegrown heirloom tomatoes, celery, onions and carrots)...

DSC_0055
...and a yummy sausage and lentil soup for me. I also made some garlic naan bread to go with our satisfying lunch (the recipe for which I'll post later this week).

Friday, August 26, 2011

Purple Sprouting Broccoli

DSC_0019
I first read about purple sprouting broccoli a few years ago while pursuing through several gardening blogs from Great Britain. At the time, I wondered why it wasn't grown more widely here in the US. Then I learned that the plant doesn't produce its beautiful purple florets until the following spring - obviously too long of a time and space commitment if you're a commercial farmer.

DSC_0034
Not knowing too much about growing this variety, I planted three specimens this past spring and they have since grown into HUGE monsters despite being set back severally from several major groundhog attacks. The largest plant is over five feet tall now. The beautiful slightly ruffled leaves have also withstood the summer heat effortlessly while our more conventional variety turned limp and yellow.

My biggest concerns now are that I started these plants too early and that they won't survive our typical New England winter. Also, it's going to be tricky trying to protect plants this size with fabric row cover and plastic in the coming months.

In any case, I decided to hedge my bets and started three more plants in late June. They are of a much more reasonable size right now and I have a feeling that they will have a better chance of overwintering.

If anyone has had success growing this variety in our Zone 6 climate, any advice would be greatly appreciated!

Wednesday, August 24, 2011

A Good Year for Peppers

DSC_0027
I'm surprised by how well our peppers have done this summer compared to last year. Our Hungarian Wax peppers have been prolific and the Poblano plants are about 5 feet tall now. I'm hoping that it had something to do with how I fertilized them this year. One of my plants had succumb to disease but the rest have remained perfectly healthy.

DSC_0030
Poblanos might just be at the top of my list of favorite peppers. I generally roast all of them on the grill, peel the skins and then store them in the freezer. They are primarily reserved for one of our all-time favorite recipes - a Roasted Poblano Pepper and Corn Soup. It packs some heat and is perfect on those chilly fall evenings. I'll have to post the recipe sometime soon.

Tongue of Fire Beans

DSC_0002
I meant to write this post last week when I harvested my Tongue of Fire Beans. The pods are quite striking when mature.

DSC_0035
As you can see, I ended up shelling a number of the beans prematurely. Oh well. I needed the bed space so all of the plants had to be pulled. Presently, the beans are lying in the freezer as I haven't decided what to do with them yet. I'm picturing some sort of stew with tomato and sausage. Any other ideas?

Tuesday, August 23, 2011

Garlic

DSC_0044
Our garlic harvest this year was very good. Our garage stunk to high heaven while they were being hung to cure. Hopefully this will be enough to get us through the next twelve months.

Monday, August 22, 2011

This Week's Pickings

DSC_0066
It's all about tomatoes again this week, not that I'm complaining. Lately I've been canning salsa and making sauce as much as I can to get our reserves back up. While it can be labor intensive at times, preserving your homegrown harvest is always deeply satisfying.

Aside from the tomatoes, I picked the last of this year's savoy cabbage and the first of our soybeans (edamame)and Poblano peppers. Despite the groundhog assault, I was able to get a fairly decent harvest from our early-sown bed of soybeans. I have two more that should be ready in a week or two.

DSC_0040

DSC_0043

DSC_0001

DSC_0027

DSC_0071

Another sign that the end of summer is fast approaching, I picked the first of our fall raspberries the other day.

Saturday, August 20, 2011

Today's Tidbit - Thai Basil

DSC_0024
Thai Basil has to be one of my favorite Asian herbs second only to cilantro. I try to use it as much as I can in my cooking. It has a has a fairly pungent licorice flavor that hold up well when cooked. I use it in stir-fries, soups, cold noodle dishes and salads.

DSC_0021
Thai basil grows well under the same conditions as sweet basil, though I find it a bit less temperamental than the latter. I pinch back the flower buds when they appear to keep the plants nice and bushy.

A Great Video on Growing Potted Citrus Trees

Growing Citrus in Containers from Cultivating Life on Vimeo.

Here's a great video on how to grow and care for potted citrus trees. I've actually been to Logee's Greenhouses in Danielson, Connecticut and purchased my Kaffir lime tree there. After watching this video, I realized that the problems I had with my Meyer lemon tree last winter were most likely due to a combination of three things - improper watering, low room temperature and using too large of a pot. Also, I think it's time to thoroughly prune my trees.

Tuesday, August 16, 2011

Mid-August Bounty

DSC_0002
This post is a bit late, but here is what we harvested in the past week. The tomatoes are finally starting to ripen in large numbers. This year I grew half as many plants as we did last year (forty), which in some ways is good since last summer at this time, it was quite stressful trying to keep up with the tomato harvest. However, this year I'm a bit worried that we may not have grown enough to get us by in sauce and salsa for the next twelve months. I may have to increase the number of plants for next year.

DSC_0038
Speaking of tomatoes, my Gold Medal and Brandywine (Sudduth's Strain) vines are producing enormous fruit. It's not uncommon for a tomato plant to produce a couple of whoppers but in this case, most of them are pretty hefty. I'm a sucker for big ugly tomatoes.

As you can see, I have a few green paste tomatoes here as well. They were salvaged when the branch holding the cluster snapped.

DSC_0010
I picked all of my Tongue of Fire beans this week. I've never cooked with fresh shell beans before. If anyone has any suggestions, please let me know!

DSC_0012
The last of our sweet corn. :(

DSC_0003
Two delicious Athena cantaloupes. (On a side note, I bought two amazing Canary and Piel de Sapo melons from the market the other week. I saved some seeds to hopefully grow them next year.)

DSC_0025
I must be growing a different variety of purple tomatilloes this year because these are almost jet black. I'm excited to make a batch of purple tomatillo salsa. The watermelon you see here was picked because a section of the stem attaching it to the vine had died off. Unfortunately, it wasn't quite ripe yet.

DSC_0014
The last of the Spring-sown carrots and possibly the last of this year's artichokes. They will surely be missed.

DSC_0003
Finally, the last of the spring-sown beets. It will be at least another month before the fall beets are ready to harvest.

The Model Farm

Polyface Farm's natural selection from denny gainer on Vimeo.

I first became aware of Polyface Farm while reading Michael Pollen's The Omnivore's Dilemma years ago and wondered whether such an agricultural model would work on a national scale. I would love to tour Joel Salatin's farm one of these days. It's evident that he's truly passionate about his work and kind of crazy (in a good way).

Sunday, August 14, 2011

Thoughts on Family, Music and Memory

I was lucky enough to have been raised a child of the '80s, though at times it feels more like the 60's and 70's. You see, when our family (my father and his five children) immigrated to the United States in November of 1980, direct from the Vietnamese refugee camps in Malaysia, we had essentially nothing but a few bags of clothes and the flip-flops on our feet. The vast majority of what we owned in our first home, a rented one bedroom apartment in Philadelphia, was either donated to us by the local Catholic church or left on the curb. More often than not, these items were beat-up old relics from the 60's and 70's, which probably explains my love for the music, fashion, toys and furnishings of the time.

I can't imagine how scary it must have been for my father - to be alone in a strange new country and not know the language or have the means to support his children, who were all under the age of eleven. Eventually however he was able to find work at the local Catholic retreat estate - first in the laundry house and then in the fifty-acre gardens. I have fond memories of being with him in that steamy laundry house while my brother and sisters were off at school. I was close to being four years old and to this day, I can still imagine those enormous industrial-sized metal washers and dryers, the constant loud pulsating rhythms they produced and the endless heaps of white linen that went into them. I remember that following a morning of washing and drying, my dad and I would sit down to a packed lunch of rice and leftovers. And after our bellies were full, I would nap on a clean towel laid directly on the concrete floor while he finished the afternoon folding.

It's strange how some memories stay with you - I think this as we come upon the 10 year anniversary of my dad's death (today, in fact). Years later I would come to realize that our stint in the laundry house was an experience he and I shared exclusively - something precious and rare when you have four other siblings. My son is now the same age I was back then and sometimes I wonder what memories the older Jonathan will have of me at this age decades from now. Hopefully they won't be of me leaving for work everyday, but rather of us in the garden while the sound of Marc practicing on the piano echoes in the distance.

As I go about my work in the garden, more often than not the music of the Carpenters, Joni Mitchell, Bread, Ann Murray and most notably John Denver reverberate inside my head. The same records heard in the early years of my life. The same ones I associate with my Dad's garden. I hope these songs will make their way into Jonathan's head when he plants his own garden one day. Maybe he'll read this some time in the distant future and decide to pick up a CD or two (that is, if they still make CDs).

State of Tomatoes

DSC_0013
Yesterday, I spent a few hours cleaning up the back garden, which had become hopelessly overgrown and difficult to navigate. I pulled up my two Petit Gris melon vines and found several half-eaten orange-sized melons. Too bad we didn't get a chance to taste them this year. It seems every summer, there's always at least one veg variety that is a total failure.

I also ripped out my beans and trimmed up my tomato plants. While the tomatoes have been slow to ripen this year, we should still get a decent crop if the weather stays warm in September. The plants have a ton of green fruit left (the San Marzanos on the left are prolific) and we should get our first bulk harvest of ripe tomatoes today.

DSC_0019
My Gold Medal and Brandywine (Sudduth's Strain) tomatoes have been slower to mature then the purples I'm growing this year. However, the fruit are enormous and have resisted cracking.

Friday, August 12, 2011

Today's Tidbit - Exploding Cabbage

DSC_0012
I guess this is what happens when you wait too long to harvest cabbage.

Our First Ripe Cantaloupe

DSC_0010
We harvested our first two Athena cantaloupes today. I took a walk around the garden after work and noticed that the outside of the melons had changed from a grey green color to buff yellow, which is generally an indication of ripeness. I decided to give them a light tug; low and behold they easily separated from the vine.

The first one I cut open was perfectly ripe and deliciously sweet. Hopefully the second one will be as good.

DSC_0004
I'm rather disappointed by the fact that we could be enjoying twice as many cantaloupes right now if it weren't for the field mice. They've also eaten through every single Petit Gris french melon that set for me this summer. It's too bad the vines are suffering terribly from bacterial wilt right now and will have to be pulled soon. Oh well. Hopefully I'll get to taste this variety next year when all of my melons are trellised.

DSC_0005

DSC_0006
My only consolation is that the cantaloupe vines are still looking relatively healthy and are setting melons again. I counted at least four today. A couple of them show signs of rodent damage but I think they will recover. Hopefully if all goes well, we'll be able to pick a second crop in September.

Tuesday, August 9, 2011

Corn Bandit - Caught!

DSC_0006
The other day, I noticed that something had been eating my corn. The cobs left strewn on the lawn were expertly stripped of their kernels. I had a feeling it was the work of a raccoon. I guess my suspicions were correct. I found this little guy in my Havahart cage when I came home from work today. I was surprised by how smelly he was and if you look closely, you can see the flies buzzing about him.

DSC_0008
Unfortunately, we weren't able to get our thief before he did this to the corn patch. Based on the crime scene, I think he pilfered about a dozen ears during the past few days - not completely devastating but a big blow nonetheless. I guess I should just be grateful that he didn't help himself to any of my tomatoes or melons.

DSC_0017
After I relocated him to the woods far away from our home, I picked the last dozen or so ears and pulled up the plants. All and all, I think our corn crop this year was a success. We were able to enjoy several meals during which Marc and I devoured up to three ears of sweet corn each and despite this setback still have enough for a couple more.

Lastly, I think I may just bait the trap again just in case Mr. Raccoon had hungry family members.