Thursday, June 30, 2011
Wednesday, June 29, 2011
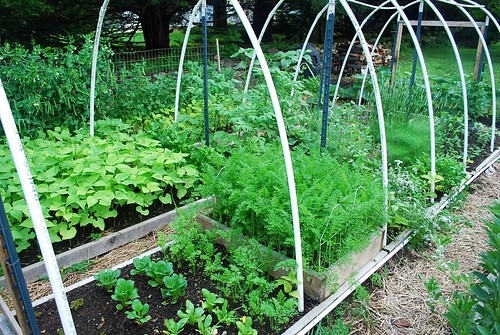
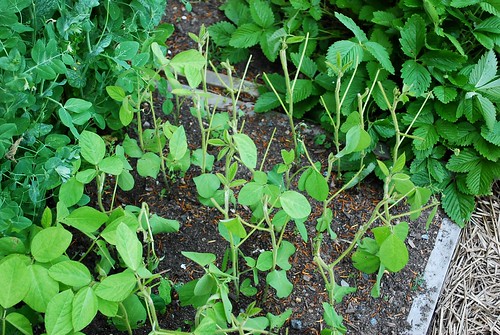
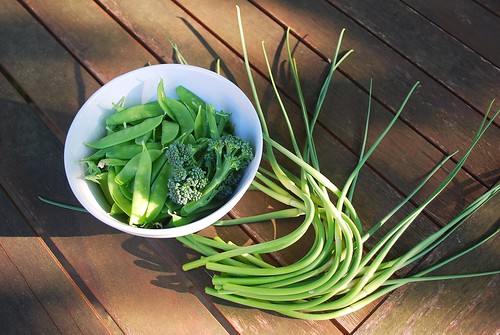
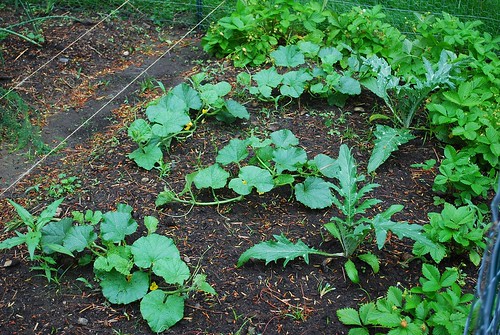
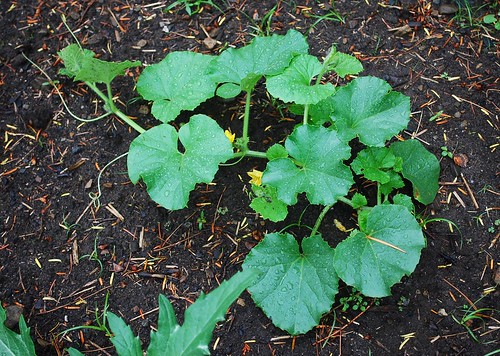
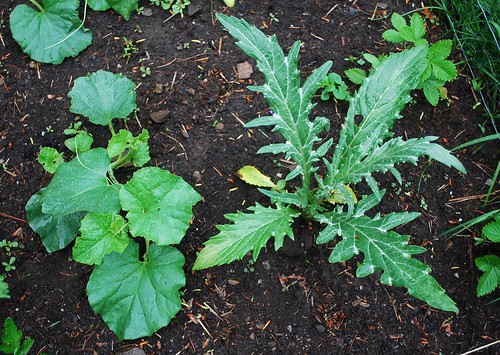
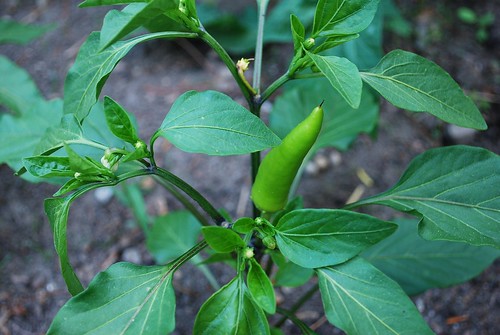
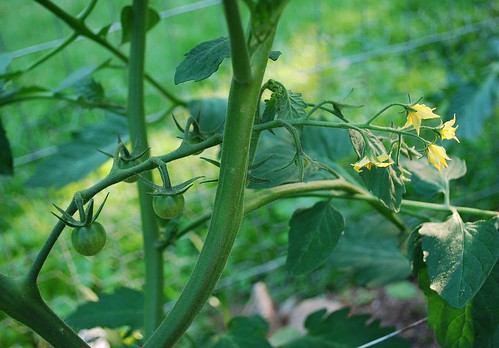
Random Scenes from the End of June Garden - Part I
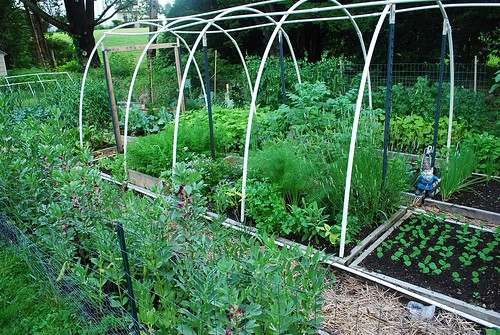
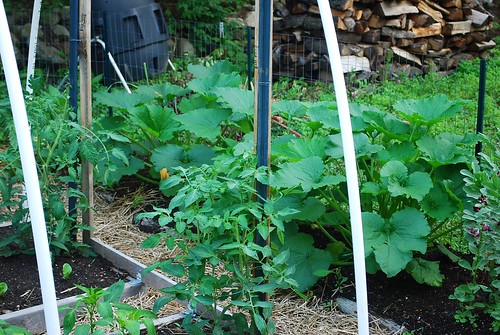
The beds are getting lush with green.
The side garden at a different angle.
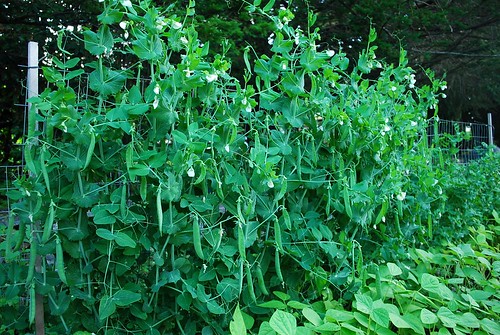
The shell peas are plumping up.
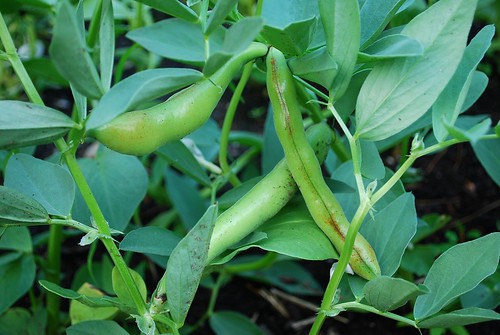
The first fava (broad) beans are ready to be picked.
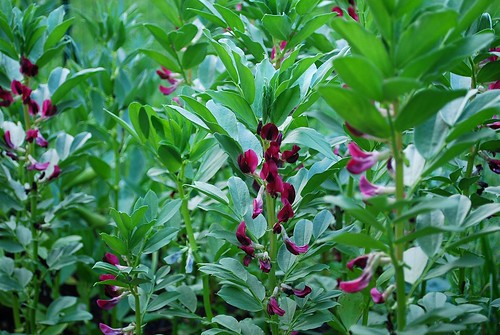
The crimson flower broad beans are still producing lots of blooms.
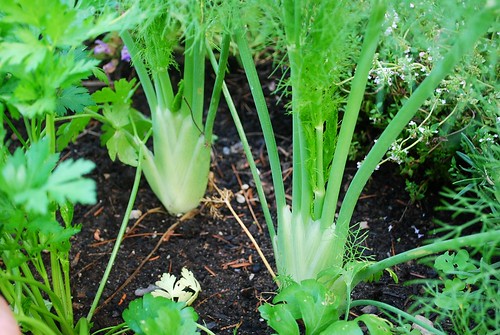
The Florence fennel is almost ready.
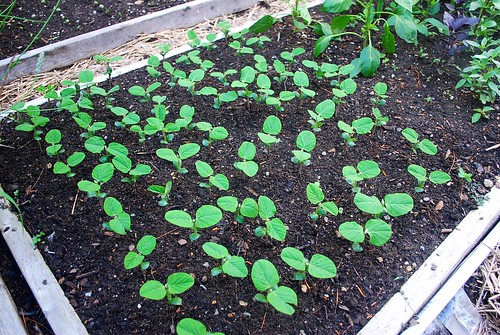
Another crop of soybeans has emerged.
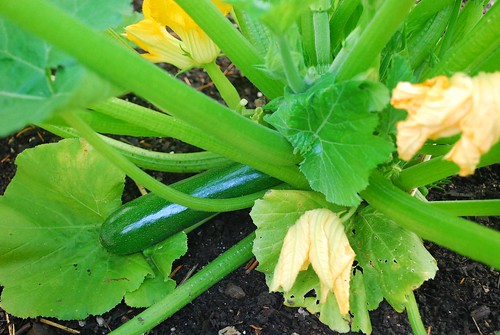
The first zucchini of the year.
My zucchini plants appear much healthier this year than they did last year.
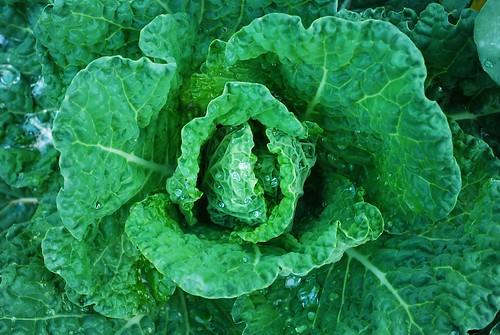
The savoy cabbage is taking its sweet time.
Monday, June 27, 2011
Groundhog Blues
I'm beyond consolable at this point. Thank God I started another batch of cucumbers a few weeks ago. At least all will not be lost this year. I will plant them in containers close to the house if I have to.
The next time I come face to face with this little punk, he's getting a shovel or bullet to the head. Start placing your bets my friends.
Pick of the Week
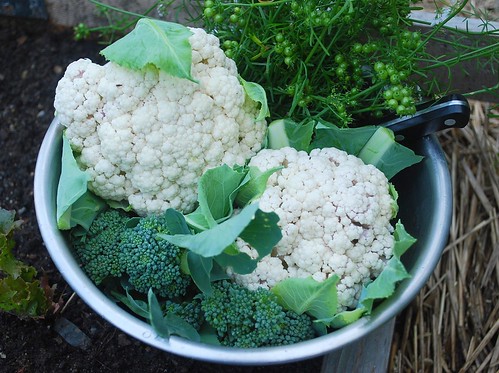
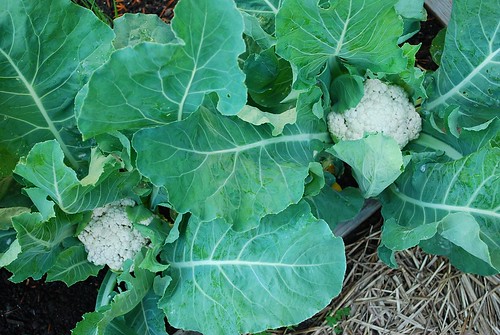
Greatings from Washington, DC. I'm just here for 24 hours but already I can't wait to fly home and eat some of the veggies I picked this past weekend. I ended up harvesting both heads of cauliflower.
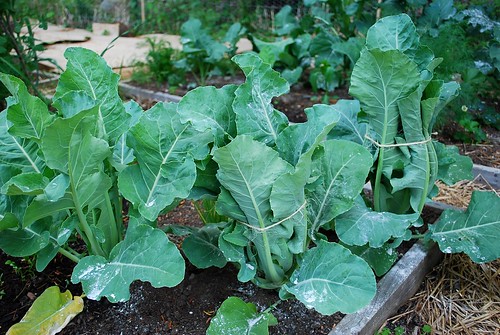
They're each about the size of a large grapefruit - perfect as a sidedish for two. The big difference between growing cauliflower and broccoli is that with cauliflower, once you cut off the head, that's it. There's nothing left to do but pull up the plant. Our broccoli on the other hand is still producing sideshoots. I wonder how far into the summer this will last. I feel like everytime I cut them off, the plants get weaker and weaker.
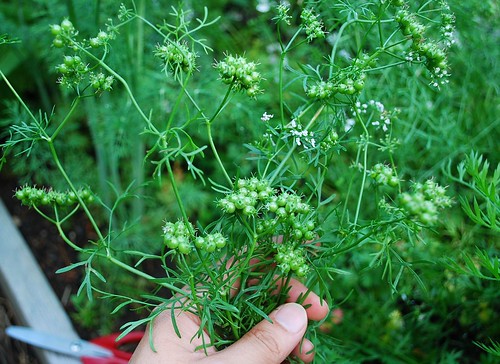
My cilantro bolted prematurely a couple of weeks ago and is now beginning to produce seed heads. I love harvesting them at this green coriander stage. They have a flavor in between cilantro leaves and dry coriander seeds. You just pick them off and stick them in the freezer for future use. They last a very long time that way. I might leave a few to fully mature and dry.
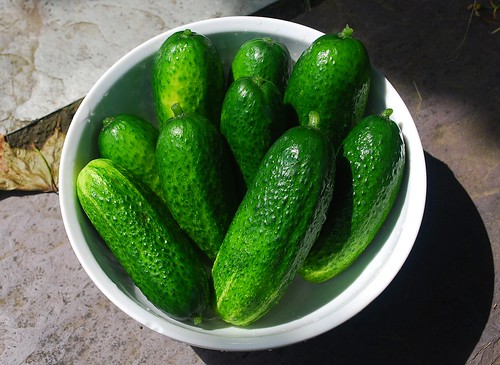
Finally, I picked 9 pickling cukes from my four plants. I have a feeling they will be prolific for the next few weeks and then trail off as the plants slowly succumb to beetles, powdery mildew and bacterial wilt - at least this is what happened to my cukes last year. I do have a game plan to try and prevent this from happening this year. I'll spray the plants with multiple applications of pyrethrin at the first sign of the beetles. Hopefully, this will prevent them from eating the foliage and infecting the plants with bacterial wilt. I'll also remove the lower leaves as the vines spread to help prevent the spread of blight, signs of which have already appeared. If anyone has any othe advice on keeping cucumber plants healthy, let me know!
Anyway, I did have time to snack on one before I caught my plane. They are REALLY crunchy, mild tasting and only slight sour on the ends. I can't wait to make pickles!
Sunday, June 26, 2011
Cauliflower and Cukes
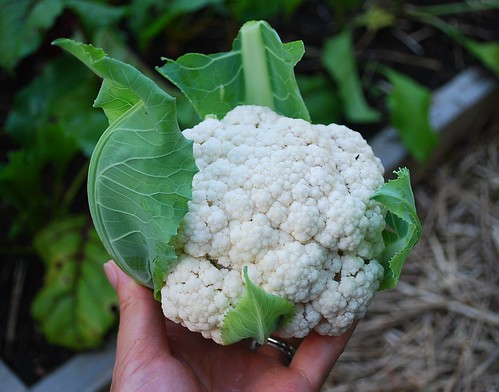
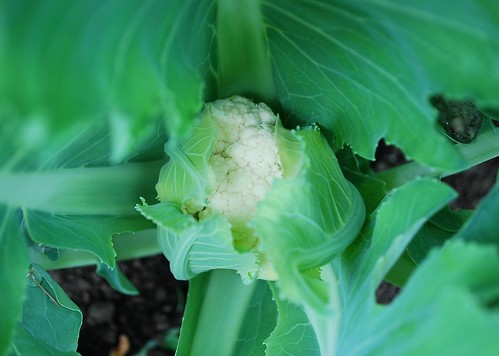
Success! This weekend, I cut the string around my cauliflower plants and noticed that sizable crowns had formed. By the looks of things, I caught it just in time as the curds were starting to pull apart.
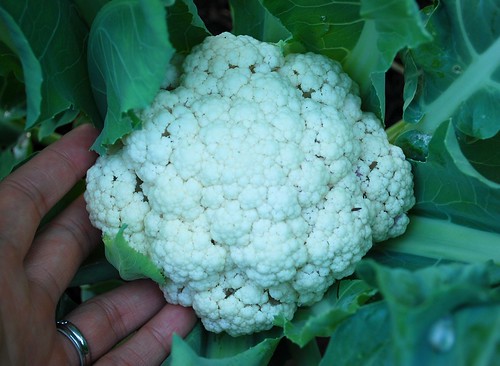
Not huge, but considering that all of my plants last year either died unexpectedly or bolted prematurely, I am pretty satisfied with this year's efforts. Now it's time to get the fall crop started.
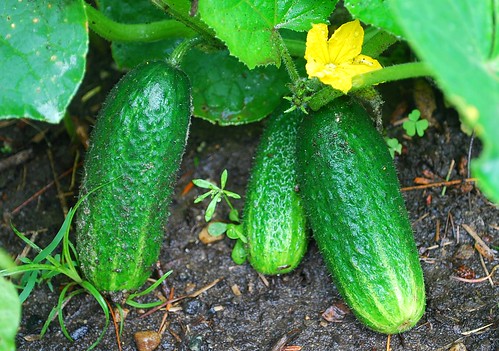
Today, I also noticed that the first pickling cukes of the summer are ready for picking. This variety is called 'Diamant'. It produces tons of blooms and best of all, the flowers don't need to be pollinated in order to fruit.
Thursday, June 23, 2011
A Message for Prospective Farmers and Homesteaders in Eastern Massachusetts
Ok, a bit of background before I deliver my message - A few months ago, Marc woke me up on a beautiful Sunday morning and told me to get dressed because we were heading to church. Knowing that Marc is an atheist, my immediate reaction was, "who are you and what did you do to my husband?" It had been more than 15 years since I'd attended church regularly. I was raised by a rather strict Roman Catholic father and attended Catholic school up until I went off to college. Plaid uniforms, scary old nuns, holiday processions - I will admit that I truly enjoyed every minute of it. In fact, if the Catholic church wasn't so opposed to my "lifestyle", I would consider sending Jonathan to Catholic school...but I digress. Despite this, I still reacted to Marc's request with a pound of skepticism and a dash of sarcasm.
Anyway, Marc told me that it was not "that" kind of church service - and so began our current (yet slow) journey towards Unitarian Universalism. Whether or not we'll ever fully get there is still up in the air but we like what we've experienced so far. (I'll save the church stories for another time.) Ok...ANYWAY, one of the best things to come about from this journey is that we met fellow church-goer Kate, who along with her husband have quickly become our good friends. They even have a son Jonathan's age and they get along like two peas in a pod. Kate, like myself is really into growing food, learning artisanal skills, eating responsibly - locally - ethically and basically all things having to do with sustainable living. When you're passionate about something, you instinctively want to share it with others and learn from others as well. I'm grateful everyday for my readers and blogging buddies. Without you guys, growing my lonely little plot wouldn't be nearly as fun, which is why there are times I wish I had a plot at a community garden. Kate is the first local person I've befriended who shares my same passion.
Recently, Kate and I came up with the idea of starting a local group of farming/vegetable gardening/animal husbandry/urban homesteading/sustainable living enthusiasts (we haven't come up with a formal name yet). Currently it's just a group of two (LOL!) but we would like to reach out to our fellow MA residents and invite all who might be interested in joining.
Our mission is pretty simple at this point - Kate and I want to learn as much as we can about small-scale farming, market gardening, animal husbandry, artisanal crafts (like cheese making, craft brewing, etc.) and some good old fashion country skills. Both of us have always wanted to intern at a farm but because of our careers and life commitments have never been able to do so. We are interested in learning real skills and practical knowledge - those that we can apply to our own gardens (and potentially our future farming/homesteading endeavors).
In a nutshell, this is what we had in mind:
To start, we would like to organize a series of farm tours several times a year. Our idea is to reach out to our local small-scale farmers and ask if they would be willing to offer our group a nuts and bolts look into their farming operations. These tours are meant to be instructional (and open to adults only). As the tour progresses, our group will be able to ask questions and seek advise on all things having to do with the running of the farm from the big picture (like soil fertility, animal health, etc.) to the mundane (state regulations, equipment maintenance). We are hoping that these tours will greatly expand our current knowledge and offer us a realistic glimpse into small-scale farming as a skill/career/lifestyle. In the end, we think that these tours will appeal to the artisan, veggie gardener, prospective farmer or urban/suburban homesteader in each of us. For the farmer, it would mean a small fee for their time and an opportunity to share their expertise with members of their community. We would like to keep each tour group small - anywhere from 5 to 10 people max. At say $30 a person, that would mean up to $300 dollars for 2 to 3 hours of the farmer's time.
Currently, Kate and I are working on a farm tour for sometime in August. We have found a local farmer (who has a 10 acre vegetable and poultry farm) willing to conduct our first tour if we can get at least 3 other people to participate. We are also speaking with a local goat farmer, who has a small cheese operation, about a possible tour later on this year. Obviously as the group grows we can discuss ideas for future tours.
Anyway, if any of my fellow Massachusetts readers would like to join our group/help us get it started/be on our farm tour email list, please email me at agrowingtradition@yahoo.com. And if you are a small scale farmer interested in giving a tour, please reach out to me as well!
Footnote - I probably should have mentioned that Kate and I are not planning on making this a for profit enterprise. For us it's about building a local community of like-minded people and giving us an opportunity to make some new friends! All fees associated with each tour will go to the farmer. Also, $30 is just a hypothetical figure I put out there. The cost will be negotiated based on the length of the tour and the activity involved. The last thing we want to do is make the cost prohibitive for members of our group. I'll let everyone know the cost well beforehand, whether it be $10 for a basic hour-long farm tour or $30 for an intensive morning-long chicken processing workshop.
Wednesday, June 22, 2011
Persimmon Blooms
This past weekend, I noticed that my persimmon tree was in bloom. They're small but quite striking.
I used a fine artist brush to hand-pollinate them. I doubt anything will come of them this year but one can hope. If any of them start developing into young fruit, maybe I'll remove all but one and see what happens. Maybe the little tree can support one lone fruit.
Tuesday, June 21, 2011
Crouching Gardener, Hidden Groundhog
And so the saga continues. I came face to face with my nemesis today, and as some of you have guessed, it was not a vole like I'd thought, but a juvenile ground hog that was causing all of the damage in the garden - the same one that was trying to find a weakness in the fence this past weekend. Evidently, he found it. All he had to do was scale the chicken wire and squeeze through the 2 x 4 inch wire mesh fencing. I am continually amazed by rabbits, and now groundhogs, and their ability to squeeze their bodies through the tightest of openings. So far, the adult ones have been too lazy to scale the fence.
Anyway, when I got home tonight, I noticed from our dining room window that Mr. Groundhog was helping himself to my soy bean plants in broad daylight without a care in the world. As I ran out of the house, my initial instinct was to grab our kitchen broom, but halfway across the garden, I dropped it and went for my garden fork instead, which was left next to the garden gate. (A heavy shovel would have made more sense but I didn't have time to grab it from the shed.) As I stormed in, Mr. Groundhog just stood there motionless. I guess he didn't know what to make of me either. Then he thought twice and made a break for it. Instinctively, I swung the fork, the back of the tines connecting with his back, rendering him flat on his belly. For a second, I thought I had seriously injured him but he quickly got back up and sat motionless, cornered against the fence.
Mr. Groundhog and I stood there face to face, about three feet from one another, as I tried to muster up the courage to dispatch my toothy enemy. This must have went on for more than five minutes. In that time, Marc wandered out of the house looking mighty horrified and then went back in upon my request. My neighbor tried to offer his encouragement, telling me that the groundhog will destroy the rest of my garden if I let him go. I had no clue about what to do. The problem was, it would have been very difficult to bludgeon him to death with the back of a garden fork. The only sure fire way to get him with one strike was to stab him with it. Both options seemed awfully gruesome. If he had to die, I wanted it to be quick and painless. All I could think of as I stood there was, "oh, what I wouldn't give for a fishing net right now!!!!!!!"
In the end, I just couldn't do it. I'll say it - I'M WEEEEEEEAAAAAK! With some prodding, he darted for the opposite side of the garden and I got a couple of good whacks into his backside before he squeezed himself through the mesh fencing and ran back to his den under the shed. Instantly, I felt regret that I couldn't take care of Mr. Groundhog. But I just couldn't do it. It would be like stabbing a feral cat to death. He also had that cute furry mammal thing going for him.
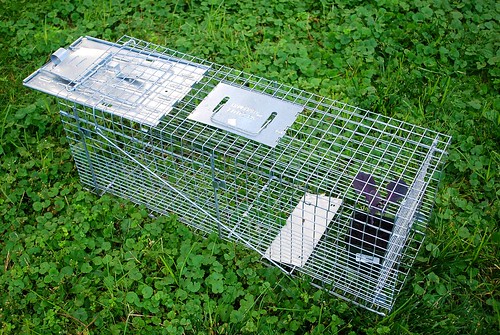
Anyway, I ran out to Home Depot and bought one of those enormous Havahart traps. I can't help but wonder - did I just blow my one and only opportunity to get rid of Mr. Groundhog? What do I do now?!
Anyway, when I got home tonight, I noticed from our dining room window that Mr. Groundhog was helping himself to my soy bean plants in broad daylight without a care in the world. As I ran out of the house, my initial instinct was to grab our kitchen broom, but halfway across the garden, I dropped it and went for my garden fork instead, which was left next to the garden gate. (A heavy shovel would have made more sense but I didn't have time to grab it from the shed.) As I stormed in, Mr. Groundhog just stood there motionless. I guess he didn't know what to make of me either. Then he thought twice and made a break for it. Instinctively, I swung the fork, the back of the tines connecting with his back, rendering him flat on his belly. For a second, I thought I had seriously injured him but he quickly got back up and sat motionless, cornered against the fence.
Mr. Groundhog and I stood there face to face, about three feet from one another, as I tried to muster up the courage to dispatch my toothy enemy. This must have went on for more than five minutes. In that time, Marc wandered out of the house looking mighty horrified and then went back in upon my request. My neighbor tried to offer his encouragement, telling me that the groundhog will destroy the rest of my garden if I let him go. I had no clue about what to do. The problem was, it would have been very difficult to bludgeon him to death with the back of a garden fork. The only sure fire way to get him with one strike was to stab him with it. Both options seemed awfully gruesome. If he had to die, I wanted it to be quick and painless. All I could think of as I stood there was, "oh, what I wouldn't give for a fishing net right now!!!!!!!"
In the end, I just couldn't do it. I'll say it - I'M WEEEEEEEAAAAAK! With some prodding, he darted for the opposite side of the garden and I got a couple of good whacks into his backside before he squeezed himself through the mesh fencing and ran back to his den under the shed. Instantly, I felt regret that I couldn't take care of Mr. Groundhog. But I just couldn't do it. It would be like stabbing a feral cat to death. He also had that cute furry mammal thing going for him.
Anyway, I ran out to Home Depot and bought one of those enormous Havahart traps. I can't help but wonder - did I just blow my one and only opportunity to get rid of Mr. Groundhog? What do I do now?!
Monday, June 20, 2011
Cauliflower and Killing
This past weekend, I noticed that heads were forming on two of my Snow Crown cauliflower plants. At the moment, they are slightly smaller than a tennis ball.
I read on the Johnny's website (where I purchased the seeds) that tying the outer leaves together helps to preserve the white curd color and results in better head quality when the curd develops in hot weather. I guess we'll find out soon enough if this works. (Just in case you're wondering - the white stuff is Dipel dust).
GARDEN PEST UPDATE - When I got home tonight, I noticed that the six lettuces I transplanted yesterday were all decapitated! Not only that, three of my broccoli plants that I set out a couple of weeks ago (and growing very well) were taken down to the ground. And to add insult to injury, the foliage was stripped from half my soy beans! F$#*& A!@@$%$%!!!!!!!! My first instinct is to blame the squirrels or rabbits but as always it turns out to be the voles, field mice or whatever you wanna call these mother#%#$#@#! Looking out our bedroom window tonight, I actually saw one roaming around in plain sight near the damaged areas.
Anyway, I had trapped a vole inside my Havahart trap yesterday and was planning on driving it to the woods a mile away from our house today. Ironically, I realized after I got off the train from work that my car battery had died, which meant I had to call for roadside assistance. Needless to say, I was in no mood for compassion when I got home and saw the latest damage. So I drowned the sucker. That's right, I said it. I DROWNED the sucker. And surprising, I didn't feel all too bad about it. (Well maybe just a little.) Marc was horrified when I told him what I had done. At this point, I'm done fooling around. Mercy is for those who want to grow weeds. This latest bandit is going down!
Sunday, June 19, 2011
Harvest of Mid-June

This week's harvest was dominated by three things - snow peas...
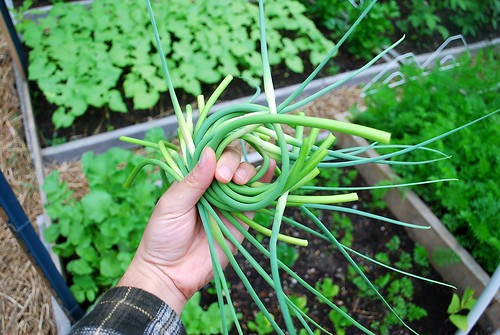
garlic scapes...
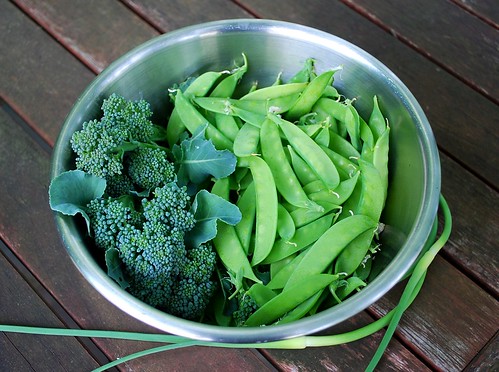
and broccoli side-shoots.
While harvesting the same things repeatedly might result in dinner dishes being a bit repetitive, I don't mind so much. It just goes with the territory of eating seasonally. And it's a reminder that we won't see large bowls of homegrown snow peas and garlic scapes again until next June.
Saturday, June 18, 2011
Zucchini Flowers and Decapitated Lettuce
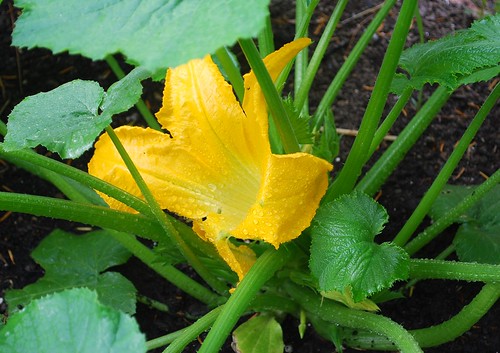
My three zucchini plants seem to have doubled in size during the past week. At the moment, they are beginning to produce flowers. The first blooms of the season tend to be all male. Interestingly, the first flowers on all three of my plants this year are female. Shame they won't get pollinated. The first male bloom should open tomorrow morning but by then it will be too late. Oh well. I'm sure a few weeks from now we'll be so sick of zucchini that we'll end up giving most of them away.
This morning, I woke up to find an adolescent groundhog circling my garden trying to find a way through the fence. A couple months ago, I noticed the lone groundhog living under our shed chasing after another around the yard. I guess it found itself a mate. The adults are brazen enough to pull at the fence with all their might. This little one only tried push its way through. I'm surprised none of them have tried digging a tunnel underneath the fence yet. Anyone have any ideas on how to evict a family of groundhogs?
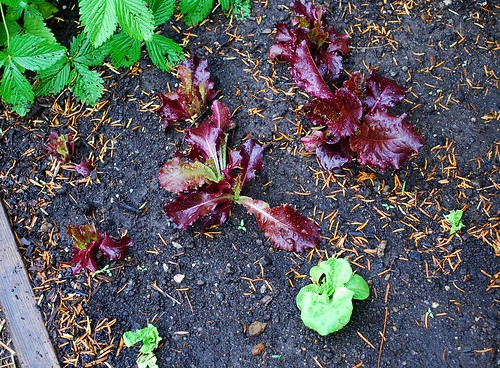
Anyway, I took a closer look at the garden this morning and noticed that something had eaten most of my summer lettuces. (F$@$#! So frustrating!!!!!) I don't think it was the groundhogs as half of the garden would have been eaten by now. Nor do I think it's the bunnies. I walked around the parameter of the fence and could not see any holes or weakness. I have a feeling that the field mice are becoming more active. I placed a few mouse traps out this evening. We'll see if they catch anything.
Thursday, June 16, 2011
Summer Veggies Update
I thought I'd do a quick post on how things are growing in the back garden.
My five Athena cantaloupe plants are growing happily among the Imperial Star artichokes.
Among my melons, Athena (F1) seems to be the most vigorous in its growth.
I'm also growing an heirloom French melon variety this year - Petit Gris de Rennes. Hopefully it's as fragrant, but sweeter, than the Charentais I grew last year.
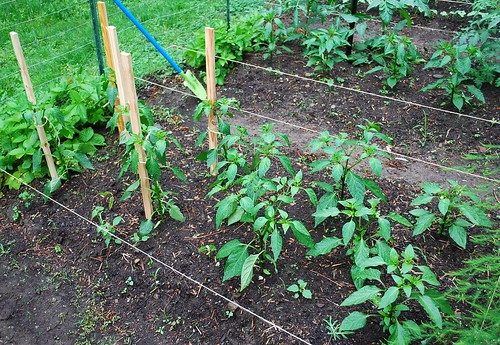
I'm growing several types of peppers this year including Poblano, Sweet Banana, Hungarian Wax, Jalapeno and Italian Pepperoncini. I staked the Poblanos but left the others to grow supported.
The Hungarian Wax seems to be the earliest of the bunch.

My cucumbers are growing well. This year, I'm growing two varieties - Tasty Jade (an early thin Japanese type) and Diamant (a pickling cuke). Both are parthenocarpic, meaning fruits can set without pollination. I hand-pollinated my cukes and zucchini last year and while I didn't mind it at the time, I won't miss having to do so this year (at least for the cukes).
My tomatoes are just starting to set fruit, which seems a bit late this year. I should have gotten them into the ground sooner. I got my first ripe Sungold cherry tomato on June 11th last year. (Admittedly, the first ones didn't taste all to great.) While chances are my tomatoes won't start ripening until sometime in July this year, it looks as though Sungold will again be the first.
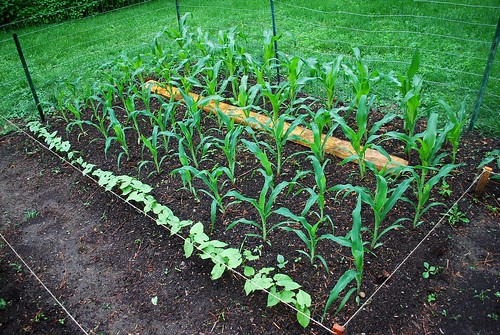
Finally, my corn is looking good. It seems like such a touch-and-go veggie to me. I had one patch last year that produced amazing ears and another in a shadier spot that produced nothing. I'm growing two varieties this year - Argent (a tender white variety I grew last year) and Ruby Queen (a sugar-enhanced variety that has ruby red kernels). I would highly recommend Argent.
Though not pictured here, I'm also growing two types of watermelon - Blacktail Mountain and Sunshine (a yellow-fleshed variety), purple tomatoes, acorn squash, Black Beauty zucchini and Titan sunflowers. These pretty much round out my hot weather crops.
Wednesday, June 15, 2011
Mystery Flowering Plant - What Are You?
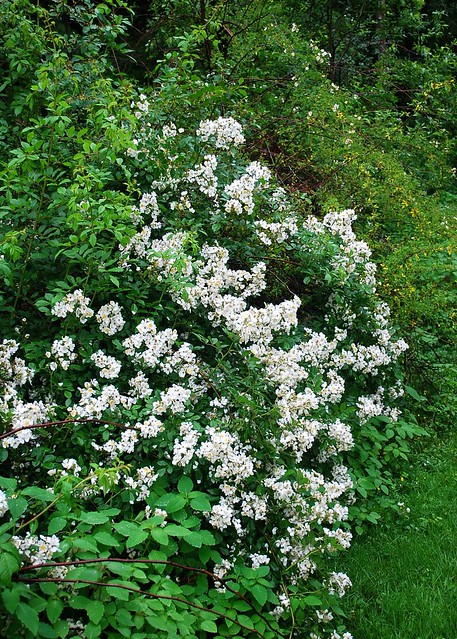

The vines are thorny like a rose and the bloom's fragrance is as sweet and heady as any good rose - I wouldn't be surprised if it was in some way related to one. If anyone has any idea as to what it might be, please let me know! I need to start learning my flowers!
Tuesday, June 14, 2011
Tomato Trellises - Trial and Error
I thought I'd do a quick post on my tomato trellises. Part of me wishes I had purchased those fancy folding tomato cages, but alas, I just can't justify the expense. Of course I could always make my own out of concrete enforcement wire but then there's the issue of finding a place to store all of those bulky cages during the winter months.
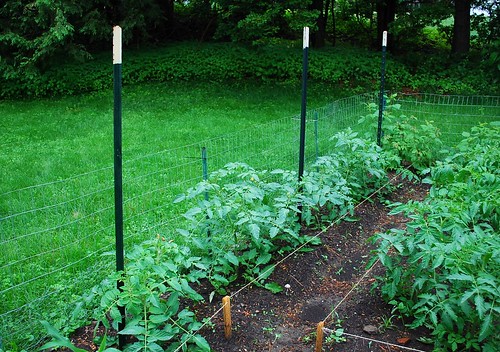
Last year, all of my tomatoes were trained using metal wire stretched horizontally along a series of 5 ft poles. The vines are attached to the wire using plastic clips or Velcro tape and as the vines grow, you just stretch another wire about 10 inches above the last.
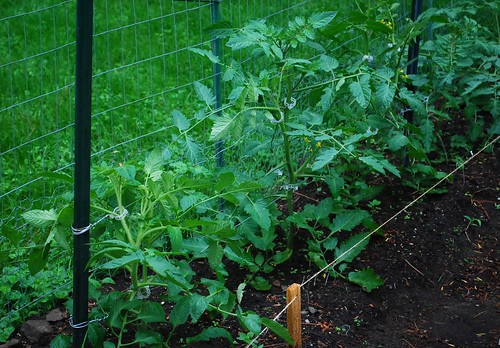
The main advantage to this setup is that it's relatively simple and inexpensive. The major downside, in my experience, is that it's just not strong enough to handle the weight of beefsteak tomatoes - the wires easily sag and the poles bend over under the stain. However, it seems to hold up just fine for cherry tomatoes, which is what I'm using this method for this year.
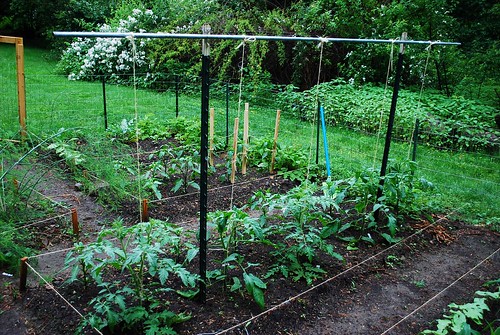
I had two 5 ft metal poles left over from last year so I decided to rig up a different kind of trellis. I attached a length of steal conduit (also something I had lying around) to the top of each pole and will train the tomatoes with strings tied to the top and attached to the vines using plastic chips or Velcro tape. The conduit's rigidity should prevent the vines from sagging and additional strings can be applied as the vines branches off.
I wouldn't call this method revolutionary but I have feeling that it's popular among gardeners because it's simple and works relatively. The only major downside I can think of to the one I put up is that at a height of 5 ft, the poles are just not tall enough. Some of last year's vines grew over 10 ft long. I'll have to decide whether to trim the vines to a reasonable height or allow them to loop over the top.
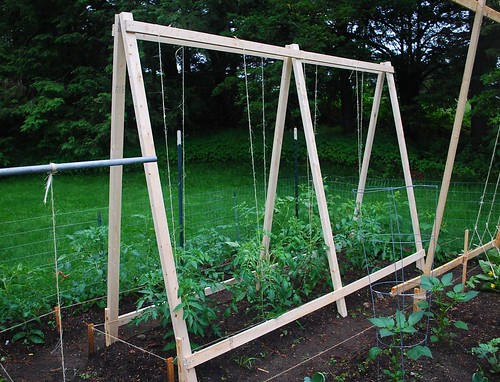
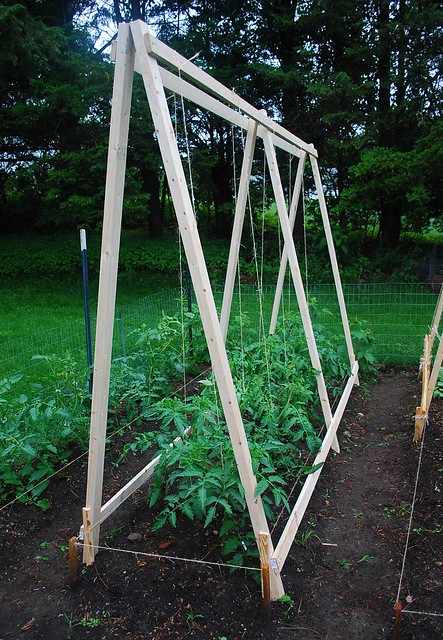
Lastly, here's the latest trellis I built applying the string method. Standing 7 ft tall, I think this height should be adequate to handle even the most aggressive vines.

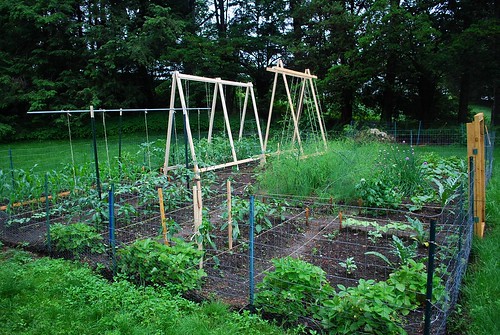
Monday, June 13, 2011
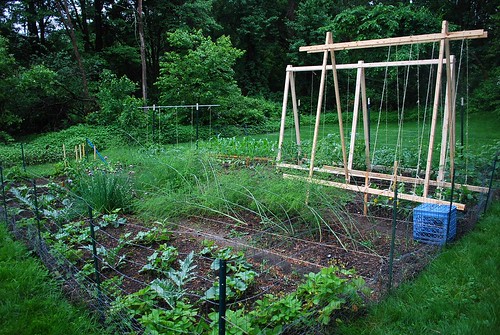
Building New Trellises for the Garden
I've given up on trying to predict the weather this year. It rained all weekend and temperatures barely got into the 60's. The rest of the week isn't looking much better. Plant growth seems to shut down during these cool and cloudy periods. Hopefully this will change as we approach July.
Anyway, I found myself working in the rain on Saturday and Sunday. I had to build and erect my two new vegetable trellises as a few of my indeterminate tomato plants were beginning to keel over. Sometimes certain gardening chores/projects cannot wait any longer (I'm sure most you will agree with me on this) so you put your boots and rain jacket like a good little gardener and just suck it up.
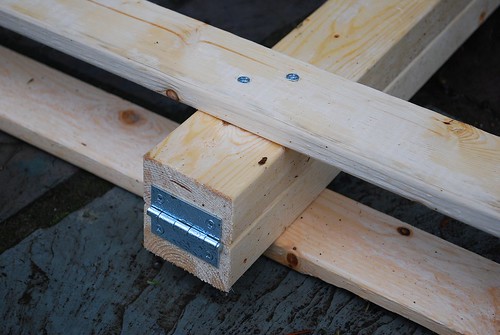
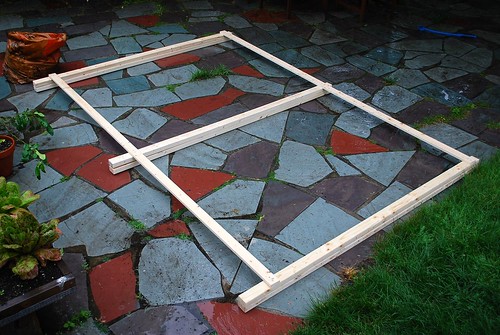
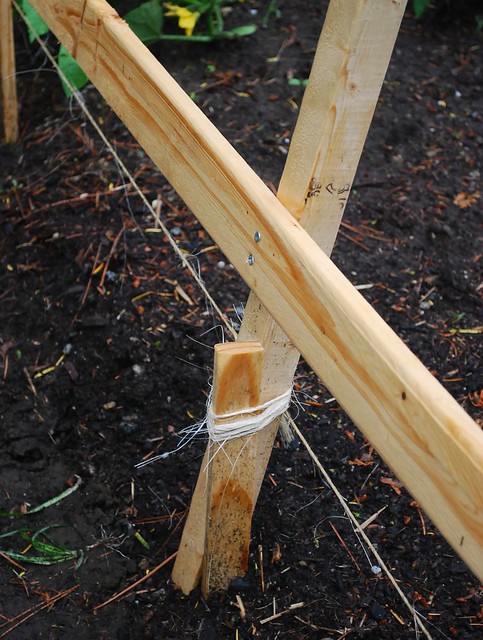
I wanted to build trellises that were fairly light weight and moveable and opened up like a tent. This way, I could adjust the angle of the vertical beams to suit the gardening space. Simple hinges were just to connect the vertical beams together.
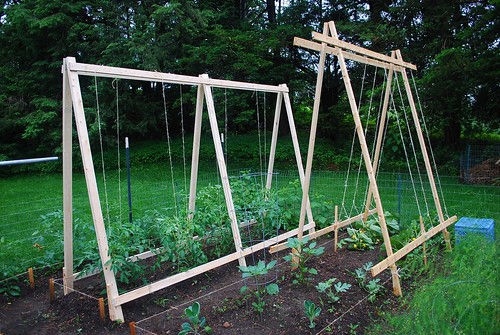
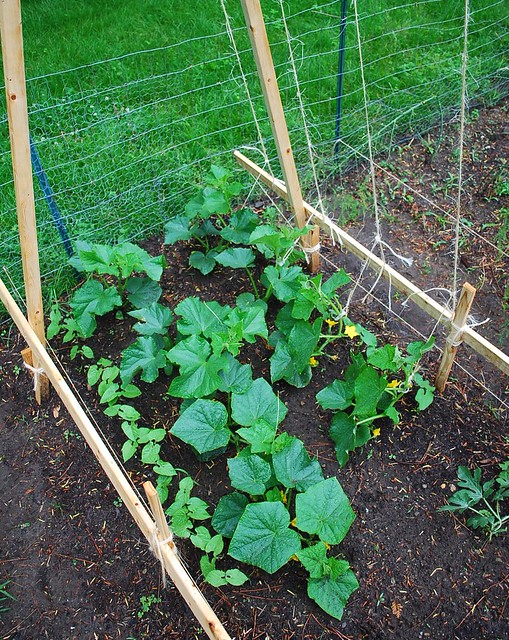
It didn't take me too long to put my two trellises together. Here is what they looked like fully installed. The cucumber trellis (right) is about 8 ft tall and 8 feet wide. I used 2 x 2's for the vertical beams and 1 x 3's for the horizontal ones. The pieces were all connected together using 2 inch screws. The tomato trellis on the other hand is 7 ft tall and 10 ft wide. I used 2 x 3's for the vertical beams and 1 x 3's for the horizontal ones. If I had to do it over again, I would have used 2 x 3's for the cucumber trellis as well.

Whenever you're constructing something for the garden, there's always a degree of uncertainty as to how it will turn out. In this case, I'm pretty satisfied with the end result. Then again, only time will tell. Tomorrow, I'll talk more about my three tomato trellises.
Subscribe to:
Posts (Atom)


