This weekend I finally got around to building my hoop house. I've wanted one for a long time now and had gone over the design in my head during the past three months. After many mental revisions and plenty of second guessing, I realized last week that time was running out and that I just had to wing it.
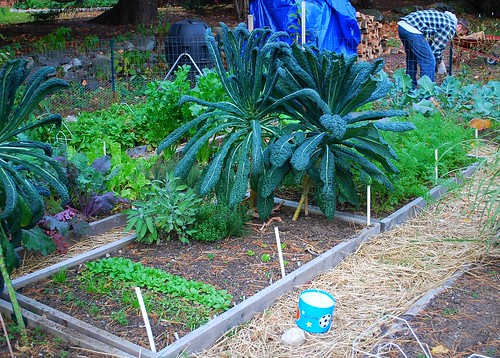
My goal was to erect a structure that would house six of my 3 x 6 ft raised beds. I wanted something that could be dismantled easily if needed and yet be sturdy enough to withstand our New England winters. Also I didn't want to spend an arm and a leg on the materials either.
Anyway, here is how it all came together:
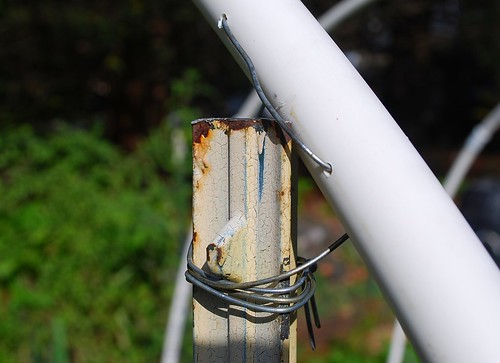
I started off by driving stakes made from 1/2 in PVC pipe into the ground spaced about 3 feet apart. (Marc is in the background loading firewood.)
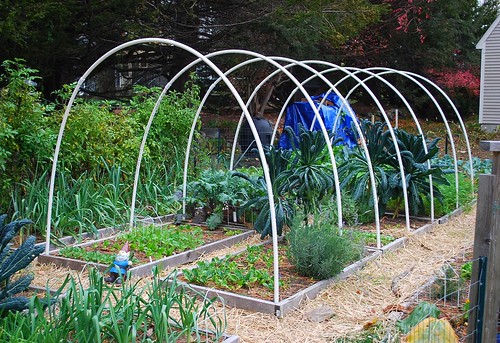
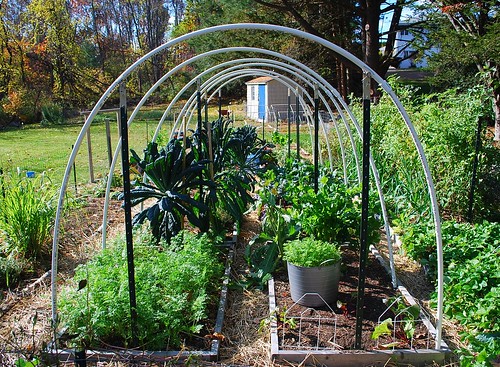
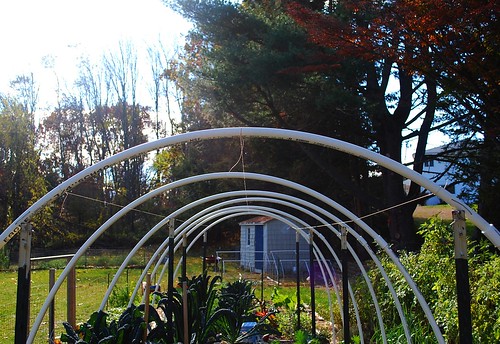
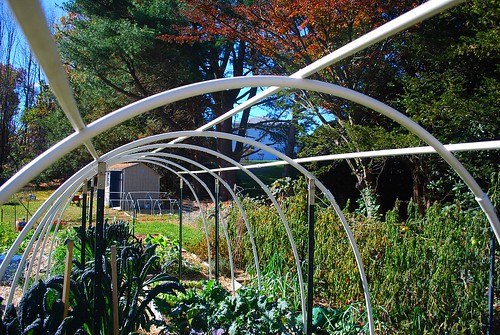
I installed the seven arches that will serve as the backbone of the hoop house by bending 15 ft lengths of 1 inch PVC piping and slipping the hollow ends onto the stakes. (PVC piping generally comes in 10 ft lengths but can be joined together easily using plastic couplings to create the desired length.)
To help prevent the arches from buckling under the weight of snow, I drove 5 ft tall metal poles (8 total) into the ground and positioned each pair underneath every other arch.
Metal wire was then used to attach the arches to the poles.
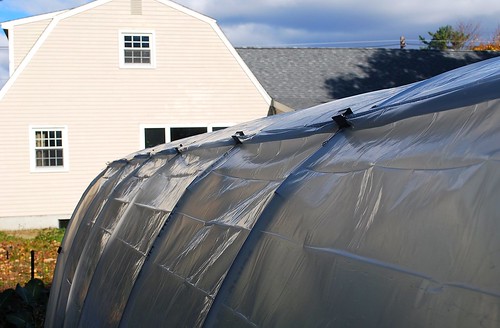
I then used string to mark the center-ridge line as well as two additional side lines that will provide additional stability to the structure.
I attached the three lines (3/4 inch PVC pipe) to the arches using metal screws. The lines help to keep the arches perfectly straight under the weight of snow.
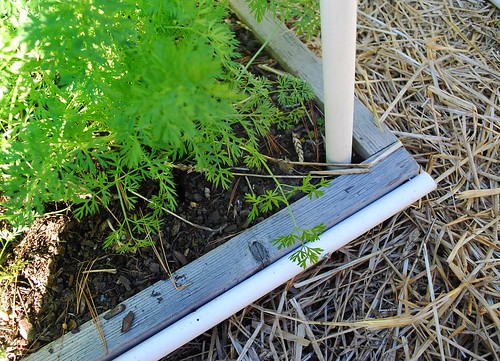
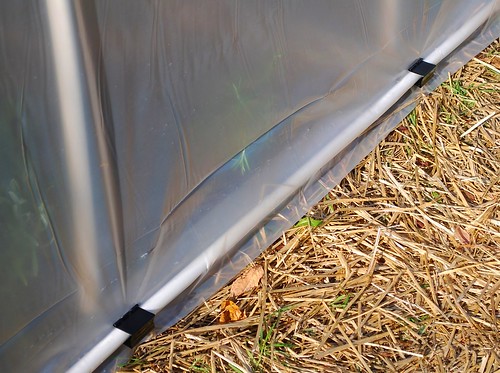
I also attached 3/4 in PVC piping to the base and down length of the structure.
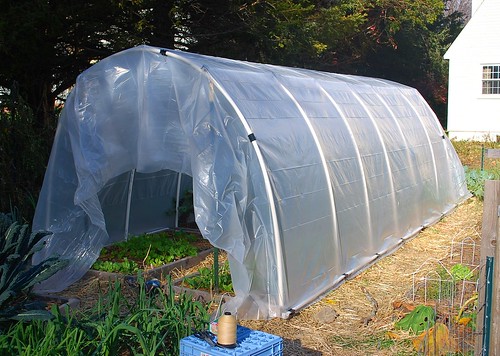
Once the hoop house frame was finished, the next order of business was to attach the plastic sheeting to it. I needed to cover an area that measured approximately 15 ft (the length of the arches) by 19 ft (the length of my beds). After deciding against purchasing professional greenhouse plastic, I went the practical route and bought two rolls of the 10 x 25 ft 3.5 mil polyethylene sheeting available at most hardware stores. (I opted for the 10 ft width because the difference in pricing between it and the 20 ft width was HUGE!)
We attached the plastic sheeting to frame one roll at the time using heavy metal clips (the jumbo-sized ones found at most office supplies stores) and allowed for a 5 ft overlap at the top. The first roll went over the center-ridge line and was attached to the far side line. Then the second roll was draped over the first one at the top and attached to the side line on the opposite side.
Metal clips were also used to attach the poly sheeting to the base of the hoop house.
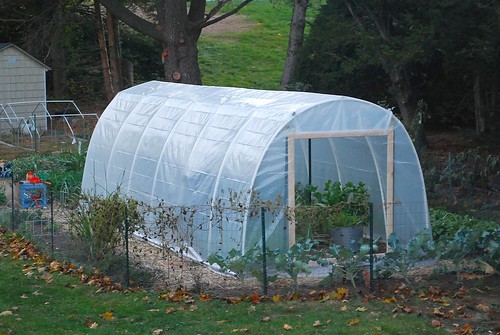
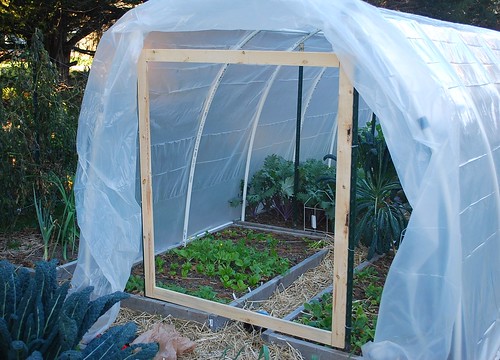
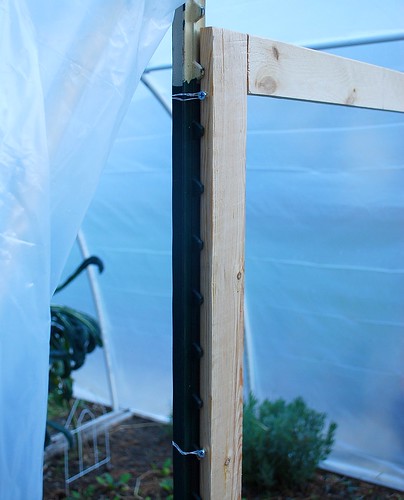
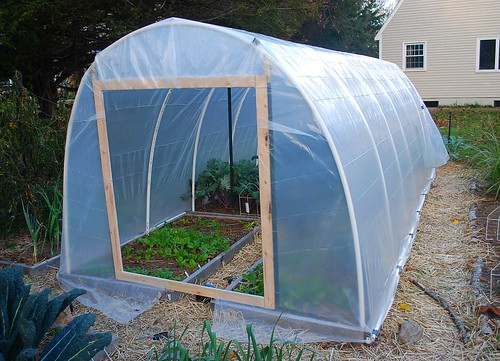
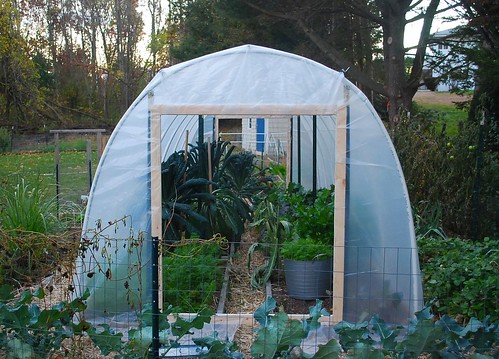
Next I focused on constructing the end-wells. The wooden frame pictured here was built using 1 x 3 inch lumber and is just wide enough to fit over the metal poles.
The wooden frame was attached to the poles using screws and metal wire. (I was pleasantly surprised by how sturdy it felt.)
I then wrapped the poly sheeting over the frame, stapled it to the inside and trimmed the excess. The end result looked reasonably neat and clean.
I have yet to construct the hoop house doors but they will fit over and be hinged to the wooden frames.
All in all, I was very pleased with my (almost) finished hoop house. It feels really sturdy and best of all, the materials (not including the metal poles, which I had lying around) cost me a modest 120 dollars. I am really excited to see how my winter veggies will fair this year and will consider growing heat-loving summer veggies inside of it as well.


Very neat. Now I wish for one too.
ReplyDeletethat's very cool, you've got me thinking now....
ReplyDeleteIt looks very professional and I love it. It will surely extend your garden season. Now if I could only build one for my garden.
ReplyDeleteIt looks great! I think it will do well for you. I will be interested in hearing how it goes.
ReplyDeleteThis is pretty much identical to the one we did a few years ago, only we used rebar as stakes instead of the pvc. Sadly, ours got shredded in the wind, I hope you don't get nor'easters! For extra heat, we moved the compost bins inside the hoop house for the winter, and also if you string Christmas lights, big bulb kind that get hot, and let them hang low all around your plants you will be amazed at the difference that makes, too - we were able to slide several potted trees in there that normally would have to come inside!
ReplyDeleteI look forward to seeing how it holds the snow. We've been thinking of something similiar but fear it wouldn't hold up to the snow here in NW Montana.
ReplyDeleteIt's quite lovely...
looks very nice and you will enjoy it a lot!!. I do wish you had chosen the GH plastic though because while it is more expensive it is worth the price difference. The plastic you bought will shred,the gaps will catch air and you will be making many repairs..it also degrades very fast so will need to be replaces a couple times a year. In the end, you will be paying out your nose for plastic.. I would asap splurge on the gh plastic and get it on there.. it will save you heartache, time and money in the end..
ReplyDeleteHey Erin, Nor'Easters are a definite possibility, which is why I opted for the cheap plastic sheeting which cost about $10 a roll. The trees in the background also serve as a nice windbreak. I figure as long as it doesn't happen too often, it shouldn't be too much of an issue.
ReplyDeleteI've always been afraid to build one because of our nor'easters, but I've always wanted one. To be able to go inside and take care of the plants would be so nice. I hope yours does well.
ReplyDeleteYour Hoop House looks great!! I am so so jealous. We are in the process of building 2 cold frames for one of the beds. It's getting cold out...so, we need to finish it this week! Great Job!!
ReplyDeleteDaphne - I hope so too! There's always a fair amount of uncertainty (like with my mini-hoops last year) but at the end of the day,I figure it's at least worth trying. Winter gardening is a messy proposition for sure, but in a way, I like the added excitement.
ReplyDeleteIt looks sturdy. Greens all winter! What a delight.
ReplyDeleteKarl built me a green (hoop) house a couple of years ago and we can feed our family of 6 all winter with it. Greens and herbs, that is.
Oh wow...I am just so impressed..it is awesome and I love how you showed the photos "as it happened". Will be following your growth through the winter.
ReplyDeleteNice job, looks great! With those supports along the top it will make it through winter with ease.
ReplyDeleteTabitha, thanks for linking to your hoophouse. Zip ties! How brilliant! I'd love to know more about what you're growing in it, when you start various things (are you simply overwintering a well established fall crop in it, a la Eliot Coleman) and whether you have trouble with aphids/pests.
ReplyDeleteThomas, your gardens are always an inspiration. I've been rolling around that same design in the back of my mind for almost a year now. We get some ferocious winds in winter/spring on Colorado's front range, so I'll be very interested to read how this new house fares in a noreaster.
Thanks again for sharing your great ideas!
That looks so neat and professional! Nice job
ReplyDeleteThis is a fabulous tutorial, thanks! I will be building hoophouses next year to shield my squash family plants from all the nasty bugs out here, and I will bookmark this link so I can do it just like this. Thanks so much for sharing!
ReplyDeleteIt came out great Thomas, will you add any heat sources?
ReplyDeleteGood job, Thomas! I hope you enjoy the hoophouse, and can't wait to see how it performs.
ReplyDeleteGreat job, Thomas! I will enjoy following your adventure in winter gardening. It really looks good. I made a solar heater out of cans two years ago which is quite easy to do. If I can find the link again, maybe I can send it to you.
ReplyDeletefarfly775 - solar heater??? You've definitely gotten my attention. Please do send!
ReplyDeleteOh wow, I'm impressed, good job, very nice, wish someone would build me a hoop house.
ReplyDeleteI've considered this. You have certainly given good directions and pointed out many things that need to be accomodated.
ReplyDeleteI'm impressed! It looks great!
ReplyDeleteKeep us up to date with how it performs please :)
Add me to your list of thoroughly impressed admirers! I'm really looking forward to hearing about how the hoop house withstands your winter storms. It's great that now you can walk inside your hoop house to tend to all the beds all at once!
ReplyDeleteHi Thomas!
ReplyDeleteThis looks so inspiring, I suddenly have a need to go out and build something...:)
I hope that the greenhouse will bring you many winter harvests and I'm looking forward to see it with the doors. Are doors facing north/south or west/east?
I had problems with my first greenhouse in some areas - the three pipes that you have placed on the top of the arches will probalby cut the plastic on both ends, as this is what happened to me. On my second greenhouse I have places these pipes under the arches.
vrtlarica - thanks for the advice! I just placed an order for greenhouse plastic and will do something about the sharp edges! Maybe something as simple as tape will help.
ReplyDeleteI absolutely love your new hoop house...good job.:)
ReplyDeleteAfter studying your design some more I just wanted to say that I really, really like the way you did the entrance way.
ReplyDeleteAmazaing. This is what I was thinking of doing, now I regret how I set up my raised beds, but I think if I really do a lot of metal supports, I can get a hoop house to fit over the 3 major beds. Thanks for your detailed instructions they really do work. Can't wait to see what you do about the doors.
ReplyDeleteVery inspiring Thomas! I've got a little hoop house experiment going on this winter! I covered one of my little 4x4 beds and transplanted winter hardy greens in there.
ReplyDeleteMy goal is to see what I can keep alive during the coldest winter months here in Wyoming. So far so good!
cheap jordans
ReplyDeletebalenciaga
goyard
supreme clothing
cheap jordans
supreme
birkin bag
jordan shoes
nike react
hermes handbags bag
Excellent very good and very informative post I really like it thank you so much
ReplyDeleteHeavy Duty tarpaulin
your blogs are outstanding class i love it.
ReplyDeletetarpaulin for sale