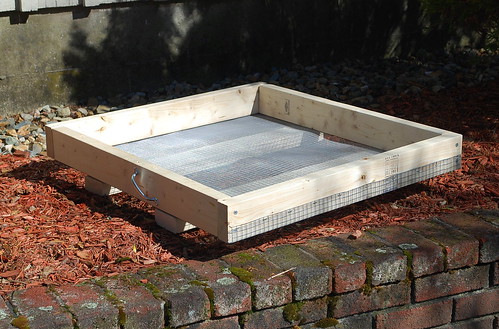
I first came across the concept of salad boxes and tables while watching the PBS show, Cultivating Life. The idea behind them is pretty start forward - many salad crops have shallow root systems and therefore only require 3 to 4 inches of soil medium in order to grow. Building a salad box or table made out of 2 x 4's enables you to harvest fresh greens right at your doorstep or even on small balcony. As a result, they are ideal for urban areas and for gardeners with limited amounts of growing space. Since they are movable, salad boxes and tables also allow you to extend your growing season. Finally, I think they would look quite attractive in any kitchen garden.
Here are the materials I used to construct a large salad box:
6 - 2 x 4 x 30 inch pieces of pine
16 - 3 inch galvanized screws
1 - 30 x 36 inch piece of aluminum screen
1 - 30 x 36 inch piece of hardware cloth (with 1/2 inch mesh)
2 - galvanized door pull/handle
4 - 1 inch galvanized screws
staple gun and staples
(Note: Since I wanted to build two of these boxes, I purchased three 2" x 4" x 12' lumber and asked the sales attendant to cut them down to twelve 30" lengths.)

1. Start by constructing the frame. Screw together four of the 2 x 4's (using two 3-inch screws at each corner) to build frame measuring 30 x 34 inches.

2. Attach the aluminum screen to the frame using a staple gun. The side of the screen measuring 36 inches should be placed on top of the side of the frame measuring 34 inches, leaving about an inch of overhang on each side. Start by stapling the corners and then at the center of each side, lightly stretching the screen taut as you do so. Then place a staple every 4 inches or so along the frame.
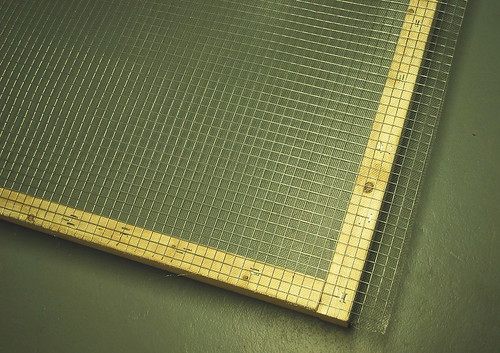
3. Place the hardware cloth on top of the screen and repeat step 2. The hardware cloth adds stretch and rigidity to the bottom of the salad box.

4. Fold and staple the excess screen and hardware cloth onto the sides of the frame.
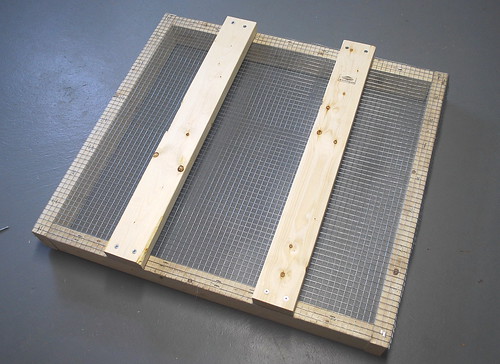
5. Place the two remaining 2 x 4's on top of the hardware cloth (positioning them about 8 inches from each side) and attach them using the remaining 3-inch screws. These will serve as the legs of the salad box and add greater stability to the frame.
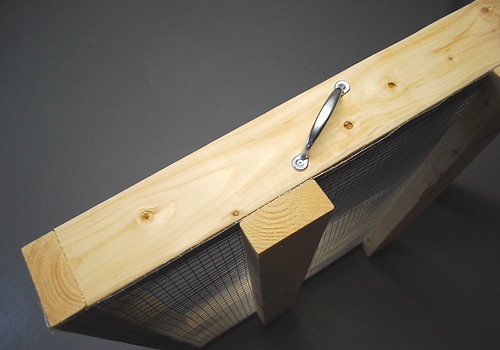
6. Attach the handles to opposite sides of the box. I placed mine about 14 inches from one end and at a slight angle simply because this felt most comfortable for me. Imagine that you are carrying a rather large laundry basket with your arms stretched out and one side of the basket resting against your lower abdomen as you walk. Ideally, you want to attach the handles to where you imagine your hands would grasp the frame in this position.

And there you have it. Pretty simple, right? The box offers about 30 x 26 inches of growing space. I can probably manage moving this box (soil and all) by myself but some of you may want to build a box half this size. This year, I intend to grow all of my baby leaf salad greens in these boxes as well as some mini-heads of lettuce and certain varieties of Asian greens (like Bonsai pak choi, tatsoi and mizuna).
If you'd like more information on salad boxes and tables, including other building designs, what soil mix to use and what greens to grow, visit the following links:
Martha Stewart's Website
College of Agriculture & Natural Resources
University of Maryland


Another inspiring post by Thomas. I have grown micro greens in a shallow box before, but I didn't realize that so many more vegetables can grow in these boxes. I can't wait to build a bunch of these. I think they also would be great to put on the roofs of my movable rabbit pens. The veges would be a nice treat for the rabbits and just in reach.
ReplyDeleteHa ! I was reading about this box this morning ! I also was browsing the Cultivating Life website, they have lots of lovely ideas (have not seen the show, tho).
ReplyDeleteCool and practical. Nice work Thomas !
Wonderful post! I have been wanting one nearby the kitchen on my deck for awhile now, and now I can sit my hubby down in front of the computer and get him all jazzed up to build it for me!
ReplyDeleteVery nice! They will be a good use of space.
ReplyDeleteGood job, Thomas. I started to build one of these on legs for my parents once, but the design I saw wasn't as good as yours.
ReplyDeleteThat turned out very nice and is a practical solution for limited space and easy access to the salad garden. I tend to use containers for most of my lettuce plantings for just this reason - no need for the deep bed and prefer to have them on the deck where I can pop out and harvest quickly for fast meal prep.
ReplyDeleteLooks good. My salad table has been the most productive part of my garden this season. I originally used 2x4's, and ended up adding a second layer of 2x4's since the soil settles greatly. I'm going to be very sad when it gets too warm to use it, and I have to store it until the fall.
ReplyDeleteThere is another great pdf here with detailed instructions on building a salad table: http://www.hgic.umd.edu/_media/documents/hg601.pdf
ReplyDeleteWhat soil/soil less mix will you be using in yours? One thing I added that I think made a big difference is a little dolomite lime, which all resources I've read avoid mentioning...
Great pictorial!
ReplyDeleteI could build this box only by looking at pictures, not reading a word.
Lovely idea for limited garden space.
Great tutorial Thomas. I love the Cultivating Life show, I get a lot of good ideas there. I bet you'll get a lot of tasty greens in your boxes!
ReplyDeleteI've seen these in use before, but never imagined how simple they'd be to construct. Another project to add to the growing list I'd like to try. :)
ReplyDeleteThat is very cool Thomas...I'm going to build a couple of those to free up some garden space...thanks!
ReplyDeleteWhat a wonderful post! Great idea, and clear instructions, thank you so much. I can't wait to try this!
ReplyDeleteHappy Gardening,
Beth
Oooh, I'm jealous. I want some of those beautiful salad boxes. I'm trying to grow mesclun and pea shoots in the shallow plastic flats that nurseries use to hold pots. They're only about an inch deep. I lined mine with plastic (empty steer manure bags)and poked holes in them, added potting soil, sowed the seeds and put them on the chicken coop roof. Yours are MUCH nicer.
ReplyDeletelongchamp handbags
ReplyDeleteadidas tubular shadow
kobe sneakers
off white hoodie
off white hoodie
jordan shoes
coach factory outlet
supreme hoodie
air max 2019
polo ralph lauren
web best replica designer bags browse around these guys cheap designer bags replica YOURURL.com buy replica bags
ReplyDeletepourquoi ne pas regarder ici dolabuy.co vous pouvez vérifier ici Dolabuy Gucci regarder ceci maintenant sacs de répliques en Chine
ReplyDelete