
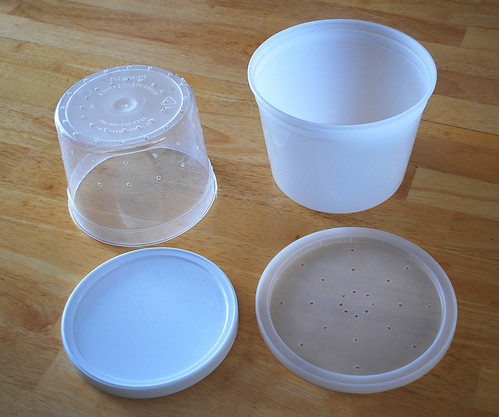
sprouting vessel
I purchased my mung beans at the Asian market. A 12 oz bag costs me 99 cents. You want to make sure that the beans you intend to sprout are food grade. If you'd like, you can buy organic beans from a supplier that tests their stock for E. Coli and salmonella. Since commercially produced sprouts have been identified as a major source of food born illness, you want to be fairly confident in your seed source. Another option is to treat your seeds before you sprout them. To do so, heat a solution of 3% hydrogen peroxide (about 2 and a half tablespoons of hydrogen peroxide for every 5 cups of water) to 140 degrees F. Monitor and maintain at this temperature using a kitchen thermometer. Using a small fine-mesh strainer, immerse the seeds into the solution and swirl them around every minute or so for 5 minutes to ensure uniform treatment. Remove the seeds and rinse under running water for 1 minute.Next, you want to soak your seeds in water for 12 hours at room temperature. Your seeds will begin to drink and plump up during this time. The next morning, drain the seeds and remove any debris or hard or discolored seeds. Then rinse them well under running water.
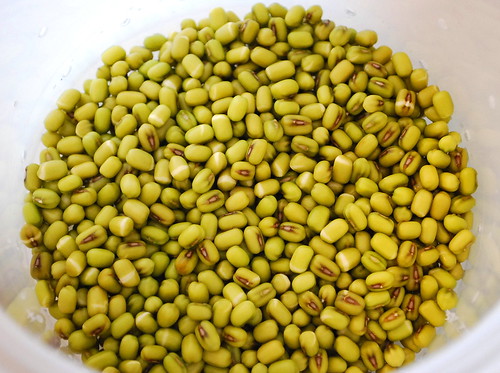
mung beans after 12 hours of soaking
Place the seeds inside the sprouting vessel, shaking it a bit to get them somewhat level. Place the smaller lid directly on top of them and add your weight. Mung beans sprouts grow longer and thicker if they are subjected to pressure. You can experiment with the amount of weight to use but I have read that you should use 0.5 ounce of weight for every square inch of surface area inside your sprouting vessel. Also, you can use practically anything as a weight (as long as it's sterile). I used a couple of ceramic ramekins of varying sizes. Place the sprouting vessel inside the larger container and cover with the outer lid. Keep your sprouter in a dark corner of your kitchen counter.
You want to rinse your seeds 2-3 times a day for the first few days. It is important that your seeds do not move when you do so as you want them to form a secure mass as they grow. Again, this will help you get longer, thicker sprouts. I rinse by removing the sprouting vessel, adding enough water to the larger container to cover the seeds by an inch or so, then slowly immersing the sprouting vessel into the water and lifting several times to rinse. Repeat this for the first 3 full days.
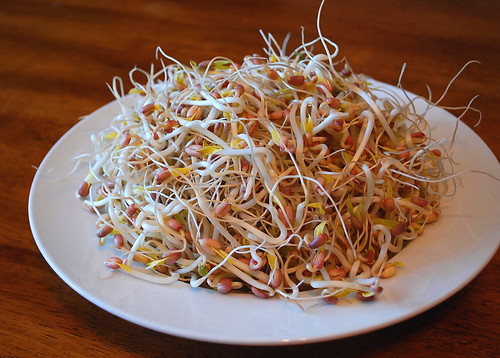
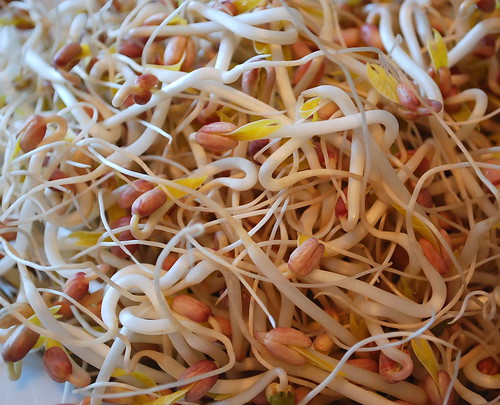
On the 4th day, cut down on rinsing to once a day for the next 2-3 days. When you do so, keep the seeds immersed in cool water for 15 minutes. Doing so encourages the sprouts to really size up. By the 5th day, you can also remove the weight. The sprouts should be firmly in place by then and should be ready by the end of the 5th or 6th day. Final tip: to separate the green skins from the sprouts, toss the sprouts gently in a large bowl with your hands. You will notice that most of the green skins end up at the bottom of the bowl. Then place the sprouts into a sink or large bowl filled with cold water. The sprouts will float and the skins will sink to the bottom. Run your sprouts through a salad spinner before storing in the fridge as they keep best when dry.
As a footnote, I've been debating whether or not "sprouting" really counts as "growing." In my opinion, the answer is a resounding "YES!" I "sprout" for the sames reasons that I grow - to know where my food comes from, eat the freshest, healthiest food and lower my food miles. If that is not enough, consider this: from 2.2 ounces of dry seed, I produced 9.8 ounces of fresh sprouts. And for about $0.20 worth of seed, I produced something that would have cost me $1.50 at the store. However, for the sake of proper disclosure, I will maintain a separate tally for the amount of sprouts I "harvest" this year.
I guess this will have to count as my quasi-harvest for this week since temperatures have been too low for me to go outside and get a proper one. I'm enjoying my early foray into the sprouting world. Since alfalfa sprouts are Marc's favorite, I think I'll purchase some organic seeds to sprout using the mason jar method.
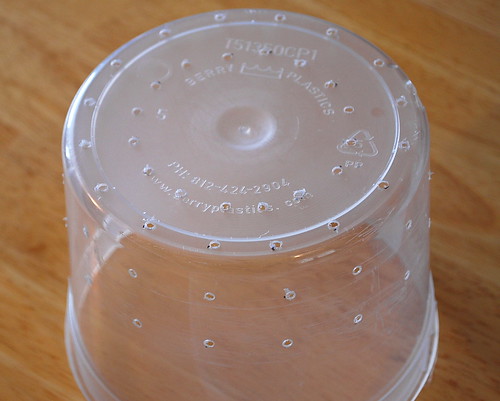
Update: I forgot to mention- you might want to make one slightly larger hole about a quarter inch in diameter at the bottom of edge of sprouting vessel. This will help drain the water during rinsing. Cover the hole with your finger when measuring your dry beans. After soaking, they should be plump enough not to fall out.


I have never eaten any kind of sprouts. I have seen seeds that are sold here in stores just for this purpose, but they are quite expensive and I’m not sure that people buy them. Its just not part of our culture... Very interesting post and method of sprouting.
ReplyDeleteAwesome post and delicious photos! I have been sprouting for about 6 months, and it is so nice to have them available for stir fries, salads, etc but they really come in handy when the winter lettuces are gone. They other night we planned on having panini sandwiches for dinner, and I had no sprouts ready, so I ran to the store to get some, thinking how good the cool crunch would be with the peppered turkey.... got home, opened the box.... YUCK! So that was about $4.00 that went straight into the trash. I need to remember to keep up that sprouting so they are there when I need them. I could have bought 3 new packages of sprouting seeds for the price of the rotten ones. Grrrr...... Great post!
ReplyDeleteOf course sprouting counts as growing, it's edible isn't it? A a nutritious punch too, I have been wanting to try sprouts for some time now for sandwiches as Erin mentioned. Johnny's has some interesting seeds available.
ReplyDeleteThose look delicious! Such a great way to add fresh food to the menu during the dark days of winter.
ReplyDeleteI'll have to make myself a good sprouter sometime. I wanted to start some this week, but since I'll be away for a bit they would just die without me. Next week I'll have to start some more. Thanks for all the good info.
ReplyDeleteThomas, You hit another one right out of the ballpark! I want to get back home, so I can build myself a sprouter. Of course, there is no place to buy beans (or alfalfa seeds) for sprouting down here, so I'll wait...but your sprouts are beautiful, and I'll bet they taste 100% better than purchased sprouts!
ReplyDeleteVrtlarica- you should definitely give them a try, they are very healthy.
ReplyDeleteErin- what you said is so true. Also, I bet many people buy rancid sprouts from the supermarket and don't even know it until they get home! Nothing worse than slimy smelly sprouts.
Kelly, I did notice that Johnny's has some interesting selections, though they seem a bit pricey. I recently spent over $100 on their site and the shipping costs alone almost killed me. I think I'll have to shop around.
KitsapFG - I'm definitely planning on adding sprouting to my winter gardening schedule. I think I'll grow sprouts when the lettuce turns bitter.
Daphne- have a great trip! And thanks again for giving me the motivation to sprout.
Thanks Gran! - I will have to post a recipe using mung bean sprouts one of these days. I think I'm gonna order organic alfalfa seeds through Amazon and utilize their free shipping. You'll be home soon enough. Try to soak up as much sun as you can before you do!
I love these sprouts and always feel a bit iffy buying them locally, as I don't know how long they have been sitting there. But phew...I need nap after reading your superlative instructions! Dedication.
ReplyDeleteAs usual, I enjoy your precision Involving rows, holes, drills :-)
Thomas..i have never done this...looks like a great winter project to try.....
ReplyDeletemore later
kary
Hi Thomas...I have recently started following your blog...I really enjoyed the bean sprouting information. I have always wanted to try this and never got around to it. They look great btw... Thanks for the diy tip...and the inspiration.
ReplyDeleteSunny- welcome to the blog! And thanks for reading. I hope you will give it a try!
ReplyDeleteThomas...why is it that I am trying to grow New England trees and you're on citrus...here i am in sunny california..and not a citrus tree in sight....but i am thinking about a meyer lemon..
ReplyDeleteit's just that i love new england so much..so i am pretending i live there...
I have not grown sprouts in more than a year, thanks for the reminder. I'll have to try your peroxide rinse.
ReplyDeleteGreat post! Sprouting is growing in my book. Living even further north than you do, I often grow sprouts as a substitute for lettuce in the winter. Dressed with a little vinaigrette, they make a nice salad. I usually buy seeds at the health food store in small quantities because they are very fresh. Old seeds just won't germinate as well. Save the water from soaking and rinsing your sprouts to water your houseplants. It's loaded with nutrients.
ReplyDeleteThomas, that was a great post on sprouting! I've done mung sprouts before, but never weighted them. I look forward to giving it a try. I love all sprouts - alfalfa, clover, even onion. And the sprouts are one of the quickest "crops" around in my book!
ReplyDeleteWOW! Your sprouts look really delicious. For how long did you grow these?!
ReplyDeleteA wonderful sprouting technique! Thanks for the post. I will try to apply the same to other veggies I know.
ReplyDeleteGood idea to grow these sprouts!
ReplyDeleteI just started sprouting. Does anyone know if you're suppose to eat the bean/seed part or if you're suppose to cut it off and eat only the white parts? I love pad thai and never get enough mung bean sprouts so decided to sprout my own, but I don't remember ever seeing the seed part in the dish. Is it edible and which part has the most nutritional value? I like the cruchy white watery part best, but maybe the beany part is just an acquired taste? :) Thanks! -K
ReplyDeleteI grew up eating lots of these mung bean sprouts, I can't wait to try to grow this at home!!
ReplyDeleteI love eating mung bean sprouts. Can't wait to try planting them.
ReplyDeleteEvery time I try to sprout mung, I get too many tiny little roots on the sides of the main sprout. why?
ReplyDeletei want to grow my sprout in just 1 day
ReplyDeletepls someone help me :) : )
im in trouble
@ freedriver- ofcourse it will dont u want it to grow
ReplyDeletewat are peroxide rinse (doubt)
ReplyDeleteI have just harvested my first batch of mung bean sprouts, and I would say I'm quite pleased. I used a colander method instead of this one. My mung bean sprouts are thin, long and also has the pink tinge on the sprout heads like yours. I researched about it, and I would like to share with you my findings. I learned that they grow a pink tinge when they are stressed & it's a defense mechanism they have. Play around with the weights as I am also messing it around to see if I can get it to grow without the pink tinge.
ReplyDeleteMine turned pink too, today, on day 5. I didn't use a weight as some instructions do not ask for it. But thanks for the message and I will experiment.
Deleteyeezy boost 350 v2
ReplyDeletejordan 6
kd shoes
hermes bags
timberland boots
michael kors outlet
curry 4 shoes
kyrie 5 shoes
lebron 16
nike vapormax
yeezy boost 350
ReplyDeleteoff white shoes
yeezy
off white clothing
retro jordans
kyrie 5 spongebob
balenciaga
supreme clothing
yeezy shoes
supreme new york
e7u22w6w81 o3g53w5g70 n9n93e9w85 c1n04n8o20 p1x37g3x85 v8x09i2g81
ReplyDeletegolden goose outlet
ReplyDeletegolden goose outlet
golden goose outlet
golden goose outlet
golden goose outlet
supreme outlet
golden goose outlet
golden goose outlet
supreme outlet
golden goose outlet