
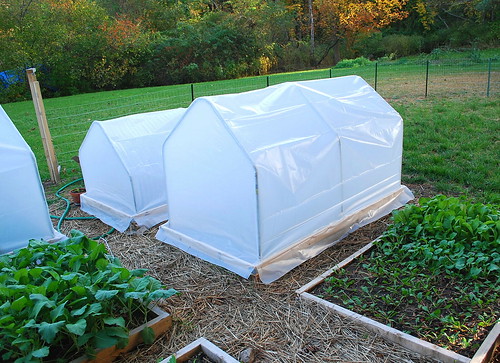
This past Sunday night, we experienced our first light frost - a slight taste of the wintry weather to come. Our neighbor found it on the windshield of his car Monday morning and any hope that I may have had for Indian summer is now gone. It's time to wind down much of the garden and winterize the rest. Luckily, all of my veggies were under row cover Sunday night and no noticeable damage was done. I am very pleased with how the Agribon row cover has performed thus far.
Last Friday, I began work on my mini hoop houses and was able to complete them Sunday night. As I had mentioned in an earlier post, I wanted to try my hand at a winter garden this year. Since we moved into our home in late July, I've been so focused on getting a fall garden planted and established that in a way, the recent cold weather has kind of taken me by surprised. I'm glad I didn't procrastinate too much on getting these constructed.
I wanted to make mini hoop houses that would fit on top of my raised beds, be movable so that I could cover different crops at different times throughout the year, and allow for easy access to the plants underneath. I also wanted to construct houses that were sturdy enough to withstand the heavy snow storms we routinely encounter here in New England, yet light enough to be lifted by one person. After much thought and second guessing, here is how I constructed my mini hoop houses:
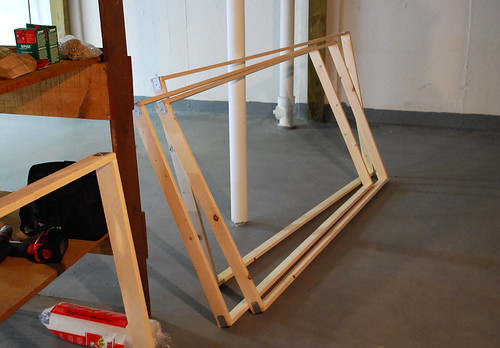
1. I started off by constructing the wood frames that would serve as the base for the hoop houses. I used 1 x 3 inch untreated spruce, which were cut into 3 and 6 feet pieces.
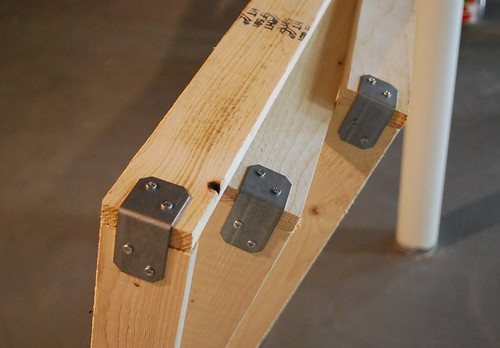
2. I screwed metal ties to each corner to hold the frame together. The finished base measures 6 ft by 3 ft, the same as my raised beds.
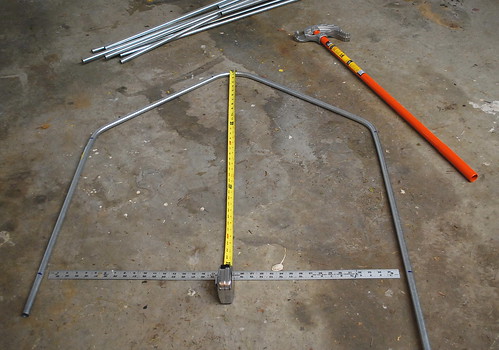
3. I purchased 1/2 inch steel electrical conduit from Home Depot and used a conduit bender to shape the rods into Gothic style arches, making sure that the width of each arch was relatively close to 3 feet, i.e. the width of my frame. I then used a hacksaw to cut the them down to the desired height. (I considered using PVC conduit but ultimately decided against it as I did not want to risk the chance of them bending or collapsing under the weigh of snow. The steel conduit is also relatively light.)
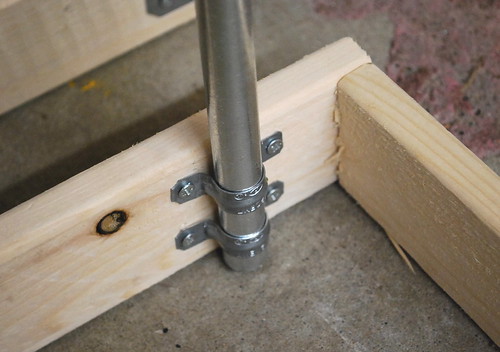
4. I attached the arches to the wood frame using metal straps. These help to keep the arches perfectly straight. The attached arches also reinforces the base.
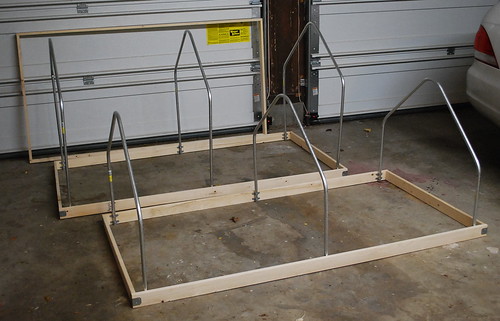
5. I attached 3 arches to each frame. I chose to go with a Gothic style arch shape for my hoop houses not only because they more attractive then semi-circle hoops in my opinion, but also because they are proven to be better at deflecting snow and wind guts.
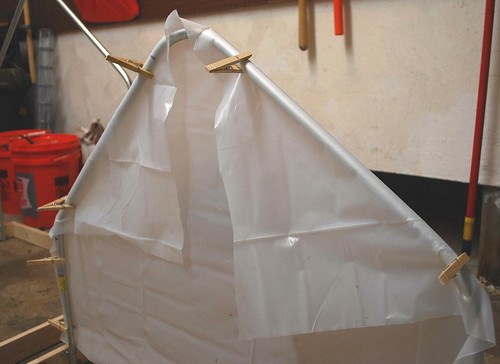
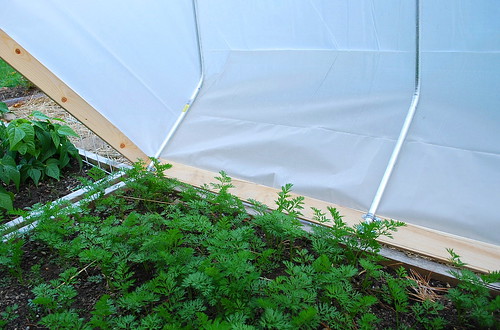
6. I then went to work on attaching 6 mil polyethylene to my finished frame. I chose this grade primarily for its strength, durability and insulating capacity, while at the same time, sacrificing slightly the amount of sunlight available to the plants underneath. I started off by using clothes pins to tighten the plastic onto the frame.

7. Then I used a hot glue gun to adhere the plastic onto the frame and trimmed off the excess. Initially, I tried using double-sided tape to do this but soon realized that the plastic would not stick to the tape. Then I tried sewing the plastic onto the frames using ordinary kitchen twine - too much work. Using a glue gun turned out to be the best and strongest option. (I tested its strength by pulling on the poly, and instead of releasing from the frame, it ripped.)
8. I decided on two different heights for my hoop houses - 3 feet and 2 feet. A taller hoop house would obviously accommodate taller plants. Specifically, they will be used to give my tomatoes an early start in the spring. The shorter houses are less awkward to handle and lighter to move. Since most winter crops tend to hug the ground, I will most likely stick to the 2 feet or lower height when constructing future hoop houses.
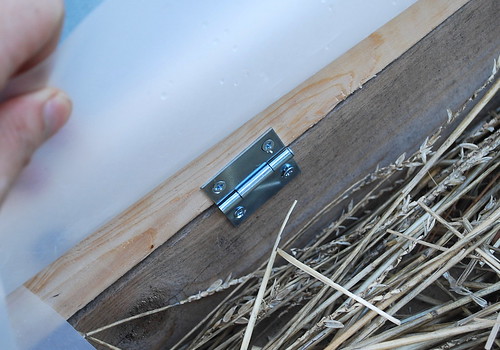
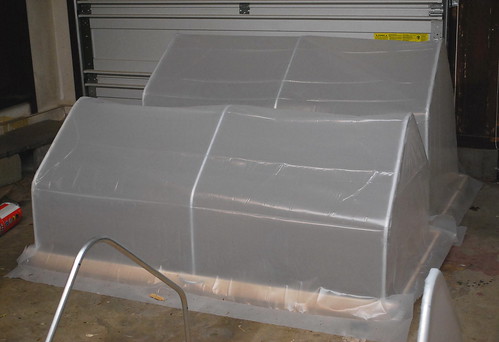
9. In the garden, I use metal hinges to attach the hoop house to the raised bed. These can be easily removed in the spring and attached to another bed if needed.
10. On the other side of the frame, I attached a metal handle to make lifting the cover a breeze. As you can see, the hinges allow for easy access to the crops grown underneath and also for easy venting.
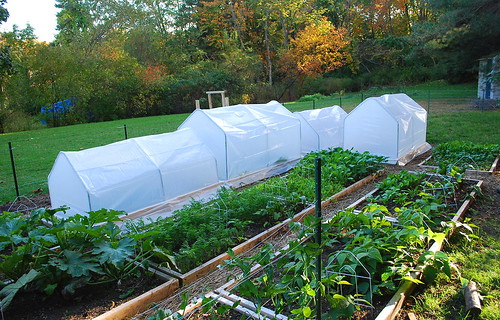
The cost of materials came to about 80 dollars. By far the most difficult and tedious part in the construction process of these hoop houses was attaching the poly to the frame. After hours of hot gluing, they are still not perfect. Yet at the end of the day, I am very happy with my mini hoop houses. Hopefully, they will do their job this winter (weather permitting). So what do you think? Am I crazy?
Footnote: I forgot to mention when I first posted this that I stapled the poly to the wood base!


I am impressed. You do everything so thorough. If you can have a wintergarden, I might use the same metods and have a spring/autumn garden.
ReplyDeleteI wouldn't give up on Indian Summer just yet. It technically comes after the first frosts.
ReplyDeleteWow, the hoops are looking good ! Great job on bending the tubes. My only worry would be ventilation. I guess you lift them up slighty to achieve air circulation ?
I'm enjoying seeing the different concepts ppl come up with as I will be building mine next Spring. I'm curious to see if the glue holds.
Those look so wonderful. I keep thinking about building something, but haven't done it yet. Maybe some year.
ReplyDeleteMiss M - Yes, the hoops will be lifted up slightly for ventilation. I need to place a thermometer that measures highs and lows inside the hoop house to get a better sense of which days I will need to vent (based on the weather forecast).
ReplyDeleteAlso I'm pretty sure that the glue will hold. I tested its strength by pulling on the plastic and instead of letting go of the frame, the it ended up ripping.
I like it, Thomas. I'm particularly interested in how the hot glue works for ya, because attaching the plastic is the biggest obstacle people have. I really like the hinges, too - but I won't be able to do that to mine. (The fence won't allow it.) Thank you very much for showing this!
ReplyDeleteThe perfectionist strikes again :-)
ReplyDeleteMost impressive, Sir.
Fantastic. I'm a new gardener. I'm reading up on season extension and hope to have something in place by spring. I'll be watching your site to see how it all works out!
ReplyDeleteSomething like that would work wonderfully to extend my kale season. If I just had time to build one! They look *fantastic* Thomas, as does the garden. Frost got everything here but the hardiest brassicas night before last. Time to pick those marble-sized Brussels sprouts.
ReplyDeleteExcellent hoop houses! They are picture perfect :-)
ReplyDeleteAnother job well done Thomas. When you open them can they go all the way back and rest of the path or do you need to hold it up as you work?
ReplyDeleteI replied to you on my blog, lady luck has not been on my side this Fall.
Hi Kelly, the covers do go all the way back but I think I will create a post of some sort that I can push into the ground to keep the cover lifted while I work.
ReplyDeleteThomas, thank you for the engineering of these and the photos. In addition to our regular styled garden (away from the house), my husband built 6 raised beds closer. Wonderful idea and plan.
ReplyDeleteYou have done a great job on these mini greenhouses.
ReplyDeleteThe only concern I would have is that your very cold temperatures would affect the hot glue, and cause it to pull away from plastic or metal.
One solution that we used for this problem is to use PVC that will fit snugly over your pipe and plastic to make a clamp.
We cut the pieces lengthwise twice, removing about 1/4 of the circumference of the pvc. Then we can use it in any length to snap over the pipe and plastic, and reinforce it with a couple of screws, if you want. I would not use it instead of the hot glue, but as insurance, sort of.
I enjoy your blog very much.
Janie, thank you so much for the suggestion! I have definitely keep that in mind as it's most like the best solution to a glue malfunction!
ReplyDeleteThomas, I am dazzled every time I check in here. I wish you great luck with your winter endeavor.
ReplyDeleteOohhh I'm impressed!
ReplyDeleteAnd inspired... We're heading into Summer down here so there's no hurry for anything like that yet, but hopefully I remember your cleverness when Autumn rolls around.
I've just discovered your blog today and I'm having fun reading through it all - great blog :)
Oops.
ReplyDeleteAnd = I'm. I'm inspired. Doh.
As someone who is always making excuses to build new garden structures, I found this how-to article brilliant in its simplicity. I'm thinking you could do the same thing in PVC without having to bend conduit. Also, I would explore options for detachable hinges.
ReplyDeleteVery elegant.
ReplyDeleteHow did the hot glue hold up to a New England winter?
Thanks for this tutorial! Gives me lots of ideas...
ReplyDeleteThere is a plastic tape that is sold for greenhouses/high tunnels. It is placed over the plastic and you staple through it to the wood. It keeps the plastic cover from tearing off the staples.
ReplyDelete