
If I were to write a cookbook one of these days, this would probably be one of the first recipes to make it into the manuscript. I have to admit that I am very proud of this one, and it just so happens to be one of Marc's favorites. I have been making these pork and shrimp potstickers for many years, but only recently decided to jot down proper measurements. Hopefully, some of you will decide to give this recipe a try. (Also, I'd like to dedicate this post to my blogger friend, Daphne, who loves all things Dim Sum.)
Pork and Shrimp Potstickers Recipe
1 lb ground pork
1/2 lb diced shrimp
1/2 cup carrots, finely diced
2/3 cup chopped scallions
2 cups cabbage, sliced thin
1/3 cup chopped cilantro
1/2 cup chopped wood ear mushrooms (reconstituted in warm water) or fresh Shitake
1 tablespoon minced ginger
2 cloves garlic, minced
1/4 cup tapioca starch (or cornstarch)
2 tablespoons soy sauce
2 tablespoons oyster sauce
2 teaspoons dark sesame oil
1 tablespoon plus 1 teaspoon sugar
1/2 teaspoon salt
1/2 teaspoon pepper
70 Chinese white dumpling wrappers (purchase the round ones, which can be found in the refrigerated section of the Asian market)
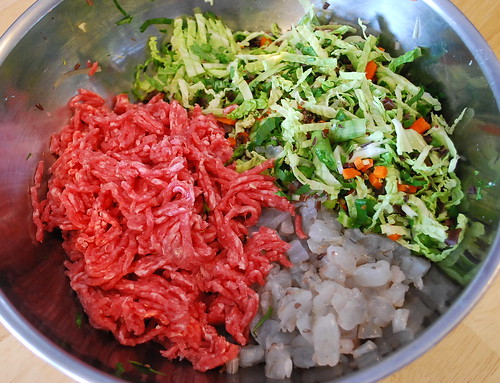
1. Combine all of the ingredients into a large bowl and mix thoroughly.
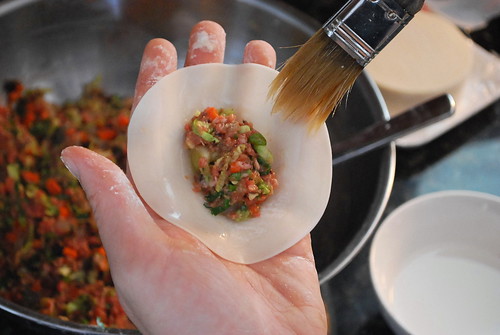
2. Fill a small bowl with water and set aside. Working with one wrapper at a time, place about a tablespoon of filling into the center. Brush the exposed edges of the wrapper with some of the water.
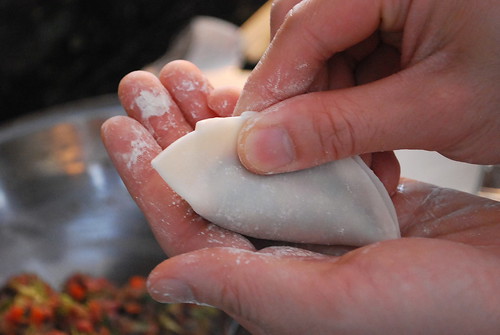
3. Begin folding the dumpling in half by pinching the top of the wrapper to form a crease.
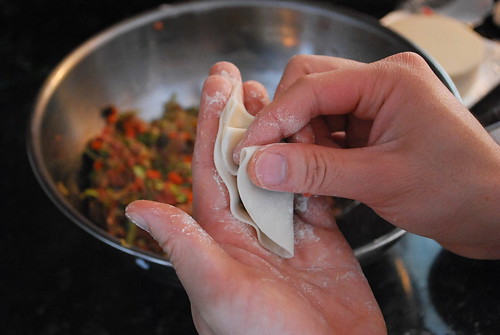
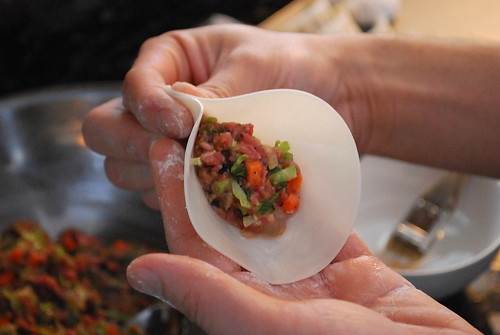
4. Lay the dumpling flat on your palm. Using your thumb and index finger, pinch a bit of the wrapper below the crease and drag it to within 1/2 inch of the top. Pinch again and drag this bit to within 1/2 inch of the last one. Repeat this several times until you've created 4 or 5 pleats on one side of the dumpling.
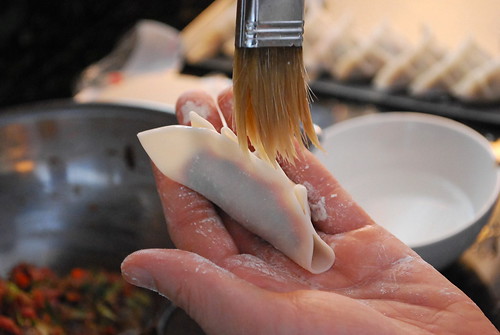
5. Turn you dumpling until the loose seams point upward. Take your wet pastry brush and lightly drag it across the seams.
6. Again, using your thumb and index finger, press the moistened seams together until the dumpling is completely sealed.

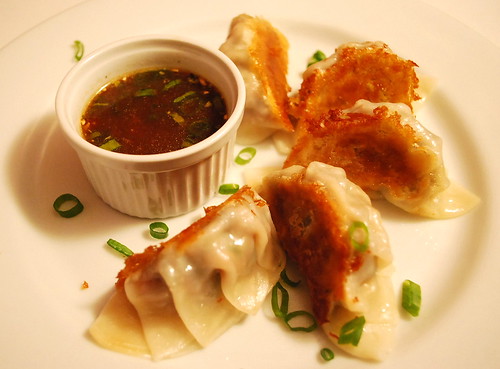
What you end up with is a dumpling that is crescent-shaped and scalloped on one side.

As you can see, this recipe makes quite a bit - anywhere between 65 and 70 potstickers. To freeze them, I put the whole tray into the freezer. Only after they are frozen solid do I place them into freezer bags. This prevents the dumplings from becoming one solid mass.
The perfect potsticker is one that is crispy on the bottom and slightly chewy on top. To achieve this perfection, the dumpling must first be fried and then steamed, a process that is easier than it sounds.
7. In a non-stick frying pan, heat 2 or 3 tablespoons of canola oil on medium heat. One at a time, add the dumplings until they fill the pan. (If you're unsure about which size pan to use, count the number of dumplings you plan to serve and then choose a non-stick pan into which they will all fit snugly, touching one other, and in a single layer. Also, you do not have to defrost the dumplings first. They can go straight into the pan from the freezer.)
8. Fry on medium heat until the bottoms are golden brown. Once they've reached this point, add enough water to almost cover the dumplings. (I would say that the dumplings should be covered by 3/4's of the way up, leaving the pinched tops exposed. Adding too much water will cause the wrappers to become overcooked.)
9. Cover the pan and raise the heat to medium high until the water boils rapidly. Then lower the heat to medium and cook until most of the water has evaporated (about 10-12 minutes). At this point, pay very close attention as you want to cook the potstickers until all of the water is gone and the bottoms are crispy again (another 5 to 7 minutes). They can burn very quickly once all of the water has evaporated so don't leave them unattended. When they are done, uncover and shake the pan a bit to loosen the potstickers. You can remove them individually or invert the pan onto a serving dish.
Orange Ginger Dipping Sauce Recipe
1 teaspoon of canola oil
1 tablespoon of ginger, finely minced
2 cloves of garlic, finely minced
2 cups of orange juice (if you are using fresh oj, add 1 teaspoon of grated orange zest as well)
1/2 cup of brown sugar
1/4 cup of soy sauce
2 teaspoons of white vinegar
1/2 teaspoon of dark sesame oil
1/2 teaspoon of ground chili paste (optional)
pepper to taste
garnish with chopped scallions (optional)
In a small sauce pan, heat the canola oil on medium heat. Add the ginger and garlic and stir for about 10 to 15 seconds until the flavors are released. Then add all of the remaining ingredients. Bring the sauce to a boil and then lower the heat to simmer for 10-12 minutes. Let the sauce cool for another 10 minutes before serving.

I can't say that this recipe is quick or fool proof, but once you get it right, it's definitely worth the time and effort. Enjoy!


yummo! I have made pot stickers a few times but just simple ones with pork & chinese cabbage. I will definitely be trying your recipe, the shrimp sounds excellent! Great series of photos Thomas.
ReplyDeleteHave you ever thought of starting a food blog? You are very good at explaining cooking and I love those step by step pictures.
ReplyDeleteIs there a recipe for dumpling wrappers, I guess it should be something easy to do?
Ooh - I love these sort of dumplings but have never dared to try making them myself. You make it look so straight forward I think I may have a go. I just need to find the dumpling wrappers. They look lovely. Thanks for sharing.
ReplyDeleteI love potstickers. I usually make mine with turkey deli meat, but was thinking I should make these with lentils instead. I also don't fry mine. I brush them with oil and bake them.
ReplyDeleteWow! Thanks for the tutorial! I love these, but unfortunately have been buying frozen and trying to dress them up with a homemade chili sauce. You have inspired me to just give it a try!
ReplyDeleteThose look amazing! They will be made here very soon.
ReplyDeleteIf it is dedicated to me, does that mean I get to eat them? ;> I do love potstickers. When I make them at home they aren't really potstickers. My family prefers them steamed, not fried. I like them both ways and am sad I never get the fried kind occasionally.
ReplyDeleteYou are so neat when you fold them. Mine are pretty badly done. They take so long to put together that I get bored and rush them.
Wow, Thomas - those really look incredible! I especially love that you can prep and freeze them to cook as needed. I just love having a freezer full of homemade "convenience" foods. I will have to make these very, very soon. Thanks for the recipe, the instruction, and all the wonderful photos!
ReplyDeleteWow! Those look wonderful! I am snagging the recipe and will give this a try when the chinese cabbage is ready for harvest a few weeks from now.
ReplyDeleteOMG! I want these for breakfast!!! RIGHT NOW!
ReplyDeleteThomas, those are a work of art! It reminds me of a dish my grandmother used to make whenever my uncles would come home to visit. She worked most of the day making the dough, the fillings; the were boiled and later browned in butter.
ReplyDeleteThank you for this recipe; I shall file it in my special notebook for when I feel ambitious. ;) Diana
Wow, these are gorgeous and look delicious. I have a question, though, do you think I could make it work in a regular stainless pan? I don't have any non-stick pans. Would it work if I removed them with just a skinch of water left, dump the water and re-oil the pan?
ReplyDeleteThanks,
Ali
Thanks for all of your kind comments everyone. I did notice a little mistake in the recipe, which I just fixed. I had chopped scallions listed twice when really it should have been 1/3 cup chopped cilantro.
ReplyDeleteDaphne, of course you can eat them! As long as you don't mind driving to Methuen.
Vrtlarica, yes you can make a slightly different version of this wrapper by hand. It's a bit tricky but one day, I'll get around to posting a recipe for it.
Di, your grandmother's dish sounds delicious. You can't go wrong with browning anything in butter.
henbogle, unfortunately a stainless steel pan will NOT work using this method...though you could always try. You might want to try steaming them first and then transfer them to a stainless steal pan to brown. Or you can play it safe and just steam them. They are delicious simply steamed as well.
Wow!!! Those look incredible. Great post.
ReplyDeleteOh Thomas....these look so good..I have never made them..seems like a good project for a stormy afternoon...I could eat those right now...
ReplyDeleteand the way you showed us how to do it....perfect..i may have to give it a go....
delicious !
more later, my friend
kary
All I can say is - yum!
ReplyDeleteI am salivating!!! I REALLY need to buy all those fish and oyster sauces etc. so I can start trying your recipes.
ReplyDelete*drooling* (but pretending there's no pork in there =) beautiful photos!
ReplyDeleteOh wow ! This is a keeper. Will try them for sure. Can't promise my pleats will be as neat, but I'll do my best ! ;)
ReplyDeleteYour dumplings are not only delicious, but beautiful! I've never made them from scratch--only bought the prepared ones and cooked them at home--but now I'm inspired. Thanks for the lovely recipe and directions.
ReplyDeleteYummy and beautiful, I never have the patience to pleat my potstickers. I'll have to try your dipping sauce, thanks for sharing.
ReplyDeleteWow, those are beautiful! Your blog post with step-by-step instructions and photos encourages me to try making them. I followed in your footsteps with the Meyer lemon marmalade (which tasted great after sitting for two weeks to let the flavors mingle). Now I'll have to try pot stickers. I have green onions and cilantro ready in the garden now, so I may give it a try this week.
ReplyDeleteWow ,I am humbled. Those are beautiful. I am overwhelmed just reading, but fortunately my partner was reading over my shoulder and is all for us giving it a go. Ah well, she's the patient one. Thanks for the inspiration.
ReplyDeleteCan I just say...I am salivating! Is that too graphic? Sorry...it's just TRUE! I want some of these so badly...SO badly. I will definitely make them.
ReplyDeleteAnd for the record...you very well COULD do a cookbook. Wouldn't it be cool to do a cookbook/slash gardening book...maybe tips on how to grow it...then what to DO with it in the kitchen...and all of it seasonally? Could be cool!
Wow, Thomas. I think you could food blog with the best of them. This looks amazing! More Asian recipes, please! :) I can't wait to see what you cook with the seeds Mac sent you. Bok choy is as adventurous as I'm able to get next year.
ReplyDeletewow those pot stickers look delicious! i love your process pictures...excellent instructions on the correct folding and pinching of the tops! your dipping sauce sounds scrumptious too.
ReplyDeleteOh yum! I love dumplings! I made these once with mixed results. However, your recipe, instructions, and beautiful photography are enticing me to try again. Thank you so much for sharing!
ReplyDeleteI lived in a city in China famous for its steamed dumplings. Now I am homesick.
ReplyDelete