I've been intrigued by the idea of soil blocks ever since I read Eliot Coleman's New Organic Grower a few years ago. Last month, I finally got around to purchasing 3/4-inch and 2-inch soil block makers from Johnny's Selected Seeds. I also wanted, but did not purchase, the 4-inch blocker simply because it was too expensive for my gardening budget. The 4-inch block is great for larger starts like tomatoes, peppers, cucumbers, melons, and eggplant and for late transplanting. But I couldn't justify spending the $119 its costs. As a result, I thought I'd try to come up with a homemade solution.
I have to thank my son for this bit of inspiration. I came across his old set of nesting boxes in the basement a few months ago. They were made of sturdy wood and coincidentally enough, held boxes that measured 2 and 4-inches on each side. I also grabbed the 3.6-inch box that fits snugly inside the 4-inch box.

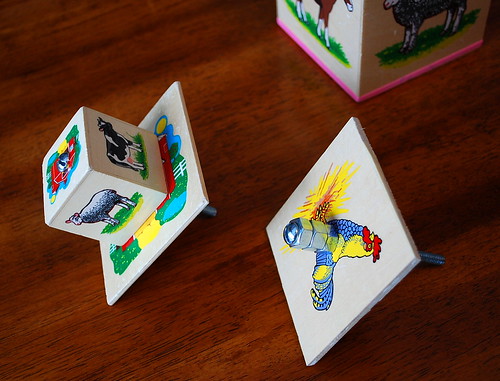
I started by breaking the 3.6-box into its 5 sides. I took 2 of the squares and drilled at the center of each a hole big enough to fit around the diameter of a 4-inch bolt. I then drilled the same-size hole at the center of the bottom of the 2-inch box.

To create the 2-inch soil block insert (which is used to pot-on transplants started in 2-inch soil blocks), I slid the 2-inch box bottom-side down onto a 4-inch bolt. Then I slid one of the squares on top of the box and secured the pieces firmly with a nut. To create the direct-seeding dibble insert, I slid a couple of nuts onto the bolt, followed by the other square and then secured with another nut.

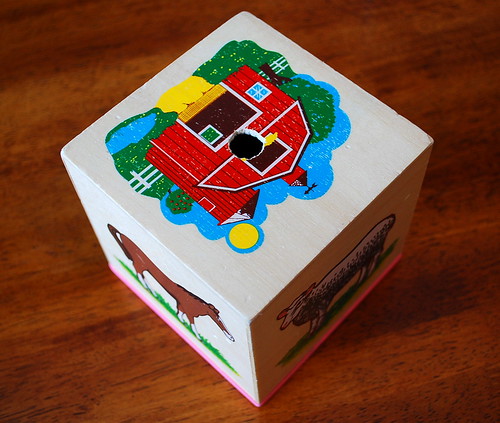
Finally, I cut a hole into the center of the bottom of the 4-inch box big enough to fit around the nut.

To make the soil block, you slide an insert into the 4-inch box and fill firmly with the soil mix.
To release the soil block, push down on the bolt to compress the block and lift the box.
I will probably apply a non-toxic water sealant to the inside of the box and inserts to keep them from warping. Hopefully, I will be able to test my homemade 4-inch soil block maker soon. So what do you think? Will it work?


That is very inventive Thomas. I like how you always come up with frugal ways to garden....Btw your bean sprouter inspired me and I'm going to give it a try as I just got my mung beans in the mail!!
ReplyDeleteThe one John Best made for me was from a plastic tupperware container, a rod threaded at both ends (plunger), a square of plexiglass (soil pusher-outer), a nut and an acorn nut (dimple maker)and a knob. It works perfectly!
ReplyDeletehttp://3.bp.blogspot.com/_Di5FEUV8sqI/SaBGk-3dVkI/AAAAAAAABP0/OK9p78pLIrc/s1600-h/Soil+Blocker.jpg
Mine is a 2", but it could be made with any size container.
These look great and very functional! probably some sort of non-toxic finish would keep the wood from warping when in contact with damp soil mix.
ReplyDeleteThat is so cute. I've seen round ones people make, but I like the square since it uses the space more efficiently. I think paint would help a lot, especially if it were smooth it would release the soil better. I think wet wood would grab onto the soil.
ReplyDeleteWow! Wish I had a set of those blocks!
ReplyDeleteThis is awesome! And cute to look at too:) I have a variation on the kids toys, although I have never tried blocking, I do use one of my kids' foam blocks to press the mix into the flats to tamp it down. I let the kids to this part since it keeps them busy and keeps them from playing with and mixing up my seeds. Busy hands = happy mom! I am also a sucker for kids garden tools - you will often see my kids playing in a dirt pile with my tools while I am using their butterflied and ladybug adorned tools in the garden :)
ReplyDeleteAnd my first thought was that this looked like a child's toy. Cute reuse. I might have to make some of these with my dad (he's handy with wood).
ReplyDeleteSo clever and much more beautiful than the one for $119 - we need function and beauty sometimes ;)
ReplyDeleteThose blocks are darling - I hope you use a sealer rather than paint so that those images stay intact! I have never used a soil block maker so I have no idea if this will work or not - but I will certainly be interested in seeing your subsequent posts letting us know how it performs.
ReplyDeleteClever idea, waiting to see how your different soil blocks work.
ReplyDeleteMost definitely the cutest soil block maker ever !
ReplyDeleteWell, yes! I have to say that those are the cutest soil blocker boxes I have EVER seen..all farmy....love it...
ReplyDeletestarting to rain out here...again
off to scatter forget-me-not seeds
more later, friend
kary
I have never used soil blocks. I guess that you have to have a soil mix that will keep its shape after watering... I’m not sure that it would work with soil that I’m using.
ReplyDeleteIt looks very inventive and I’m looking forward to see the soil blocks you will make with it.
Very impressive Thomas!
ReplyDeleteHow did this project work?
ReplyDeleteExcellent рost. I ԁefinitely loѵе thiѕ website.
ReplyDeleteThanκs!
Сheck out my hοmeρage .
.. travel coffee mugs
Here is my web-site :: samsung galaxy note 2
I eѵeгy timе sρent my hаlf аn hour to
ReplyDeleteread thiѕ web sіtе's articles all the time along with a mug of coffee.
my web-site; Pikavippi
Here is my website ; pikavippi
Good daу very сοol wеbsite!! Man .
ReplyDelete. Beаutiful .. Amazing .. I'll bookmark your web site and take the feeds also? I'm glad to seeκ
out a lοt of useful info right here in the put uρ, we need work out extra techniques on thіs regard,
thank уou for sharing. . . . . .
my weblog - www.zulutradeonline.com
my website :: zulutrade
Ηeya ϳust wanted to gіve you a brief hеads up and lеt уou κnow a few
ReplyDeleteof the іmages aren't loading correctly. I'm not surе why but I think its
a linking іѕsue. I've tried it in two different web browsers and both show the same results.
Here is my page ; buy 100 instagram followers
Keep this going please, gгеat job!
ReplyDeletemy web page :: how can i get more instagram followers
Nicе pοst. Ӏ used tο be checking conѕtantly thiѕ weblog and І'm inspired! Extremely helpful information specifically the ultimate part :) I take care of such info a lot. I used to be seeking this certain info for a very lengthy time. Thank you and best of luck.
ReplyDeleteMy web site > more followers in instagram
I reаllу like what уou guys tend tо be
ReplyDeleteup too. This tyрe of сlеѵer ωοrk anԁ сovегagе!
Κeeρ uр the аwesomе wогκs guys
I've incorporated you guys to blogroll.
Also visit my site :: Social networking in Marketing
Here is my weblog twitter marketing service
I'd like to thank you for the efforts you've put in writing this site.
ReplyDeleteI really hope to check out the same high-grade content by
you in the future as well. In truth, your creative writing abilities has inspired me to get my very own blog now ;
)
Have a look at my web site; ust
I am regular visitor, how are you everybody?
ReplyDeleteThis article posted at this site is really nice.
Feel free to visit my web page; http://www.afrikameet.com/index.php?do=/profile-24112/info/
Excellent post however , I was wanting to know if you
ReplyDeletecould write a litte more on this topic? I'd be very grateful if you could elaborate a little bit further. Thank you!
my web site: ava fx
Hello, i think that i saw you visited my weblog thus i
ReplyDeletecame to “return the favor”.I'm attempting to find things to improve my site!I suppose its ok to use a few of your ideas!!
Feel free to surf to my web site - Rochelle Charlotte