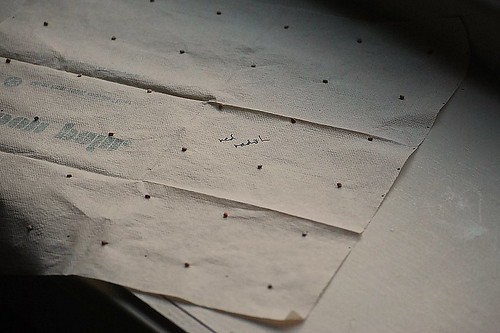
Homemade seed mat of radishes spaced 2 inches apart.
Have you ever come across an idea that sounded a bit silly or even crazy at first, but then the more you thought about it, the more you realized how absolutely brilliant it is? In this case, it took me about 5 seconds to see the light of day. And I have to thank none other than Granny from Annie's Kitchen Garden for enlightening me.This my friends is a homemade seed mat - my first and therefore a bit of an experiment. For me at least, the benefits of these mats seem endless. Here are just a few I can think of as I'm writing this:
- The obvious - thinning, or lack there of. Since you've perfectly spaced the seeds on the mat, you no longer have to spend time thinning your seedlings. Carrot growers rejoice!
- Eliminating waste - Since you no longer have to thin, you also get to keep more of what you sow. Seeds are becoming increasingly expensive these days and more gardeners are choosing to save seed. These mats allow you to maximize your seed usage.
- Aesthetics - The perfect spacing achieved by these mats gives your garden an ultra-neat look.
- Maximizing space - Seed mats allow you to maximize your available square footage by evenly spacing your plants according to their specific requirements. This is particularly important if you only have a limited amount of growing space in your garden, hoop house or cold frames.
- Regulating growth - Because your plants are evenly spaced, their overall growth becomes more regulated.
- Time and flexibility - You're sowing entire mats, which is a fraction of the time it takes to sow individual seeds. (Your back will thank you.) Also, it took me about 15 minutes to construct 3 mats while comfortably sitting at a table. This is the type of gardening I don't mind doing at 11 pm.
- Finally, cost - It costs next to nothing to make these mats and chances are, you already have the materials in your home. A six-row seeder costs $549.00.


Great idea -- I've been experimenting with germinating seeds with the kids' technique of putting them with a wet paper towel in a baggie (and reusing the baggie for the next round). So far it works great (has worked on both veggies and perennials I've tried), and Granny's technique is a much more sophisticated method well suited for raised beds. I will give it a try!
ReplyDeleteWell, as granny will tell you, I do it the "flicted" way. It IS a brilliant method to sow seeds with, but i'll probably not take part in it. Besides - it would only add fuel to the existing assumption from my wife that I'm mildly retarded, among other problems.
ReplyDeleteDon't listen to EG, Thomas. He's one of those macho guys who likes to do things the hard way. Besides, he talks funny ;-)
ReplyDeleteWell done on your seed mat. You won't always get 100% germination from the mats, but usually it's close. You'll be able to see if you have a bare spot (or a few) and just reseed those spots by hand...no biggy.
Do post how it turns out with your seed mats. I've never used them.
ReplyDeleteMeredith- I've never tried that, but it sounds very promising for plants that require a larger square footage of growing space, making seed mats impractical.
ReplyDeleteEG - unfortunately, many of us don't have your surgical precision.
Gran - That's what I was think. In the past, I've been lazy to fill in gaps but really, there's no excuse if you catch it early enough.
Mary - I sure will!
I like her technique too. I've seen it done on several blogs. I think it would help the seeds germinate since the napkin would wick up the water from the surrounding soil, keeping them nicely moist. Maybe next year I'll try it.
ReplyDeleteI have used the technique with mixed results. Germination was close to 100%, but pest damage was at least 50%, usually more. My two cents is when I sow carrots using that nice organized method there are fewer seedlings, so when some get eaten it is obvious. If I sow way too many and thin, I don't miss any that became a slug's snack.
ReplyDeleteVery nice! I just completed mine today also (posting on tomorrow).
ReplyDeleteThomas...I just love the idea of this...making your own. I've tried store bought seeds on a tape..to be perfectly honest with you..mine were a total failure...but you might have better luck..and since you made them...you might have super luck. Mine were from like a Target or something. Bought them cause the box was a cute watercolor. Seeds were probably a thousand years old. That's what I get. But that box looks cute.
ReplyDeleteMore later
Kary